| SimMechanics | |
Modeling Actuators
The SimMechanics Sensors & Actuators library provides a set of Actuator blocks that enable you to apply time-dependent forces and motions to bodies, joints, and drivers.
You can use Actuator blocks to perform the following tasks:
In general, actuators can apply any combination of forces and motions to a machine provided that
Actuating a Body
You can use actuators to apply forces and/or torques, but not motions, to bodies. (You can apply motions to a body indirectly, using Joint Actuators. See Applying Motions to Bodies following.)
Body Actuator Example: Pure Kinetic Friction
The mech_ballistic_kin_fric model in the Demos library provides an example of how to implement pure kinetic friction. This type of friction is a continuous force that depends on a body's motion relative to a medium (such as air), as well as on physical characteristics of the body. Kinetic friction, unlike "stiction," involves no "sticking" or locking of motion, and the friction is not discontinuous. While you could use the Joint Stiction Actuator, this is not necessary. This model applies air friction or drag to a projectile with a Body Actuator.
Open the Air Drag subsystem. If you double-click the block, a mask dialog box opens asking for the drag coefficient Cd. If you right-click the block and select Look under mask, the subsystem itself appears:
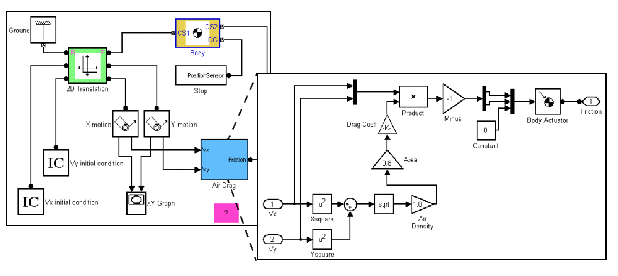
The Air Drag subsystem computes the air friction according to a standard air friction model. (See the Aerospace Blockset documentation for more information.) The drag always opposes the projectile's motion and is proportional to the product of the air density, the projectile's cross-sectional area, and the square of its speed.
Run the model with the default drag coefficient (zero). The XY Graph window opens to plot the parabolic path of the projectile. Now open the Air Drag dialog again and experiment with different drag coefficients Cd. Start with small values such as Cd = 0.05. For a rigid sphere, Cd is two. The effect of the drag is dramatic in that case.
Applying Motions to Bodies
The Body Actuator block cannot actuate a Body with motion signals. But you can construct such body motion actuators with a combination of other blocks. See Joint Actuator Example: Body Driver.
Actuating a Joint
You individually actuate each of the prismatic and revolute primitives of an assembled joint. You can apply
| Note You cannot actuate spherical or weld primitives, disassembled joints, or massless connectors. |
To actuate a prismatic or revolute joint primitive of an assembled joint:
A force or torque signal must be a scalar signal. A motion signal must be a 1-D array signal comprising three components: position, velocity, and acceleration. The directionality of the joint determines the response of the follower to the sign of the actuator signal (see Joint Directionality).
| Note SimMechanics allows you to connect multiple Actuators to the same primitive. But it halts and displays an error message if you attempt to update or simulate a model containing such a connection. Exception: You can apply a Joint Initial Condition Actuator and force or torque actuation (including stiction) to the same primitive. See Specifying Initial Positions and Velocities. |
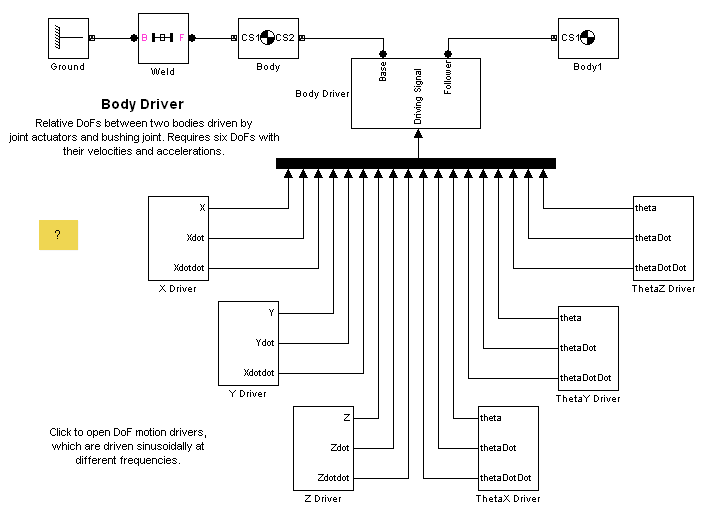
Joint Actuator Example: Body Driver
The mech_body_driver model in the Demos library illustrates the use of Joint Actuators to create a custom driver.
The Body Driver subsystem accepts an 18-component signal that feeds the coordinates, velocities, and accelerations for all six relative DoFs between Body and Body1. The subsystem uses a Bushing block that contains three translational and three rotational primitives to represent the relative DoFs.
You can modify the body driver to move only one of the bodies, thereby creating a motion actuator. To move Body1 relative to World, for example, remove the blocks Body and Weld and connect the subsystem Body Driver directly to Ground.
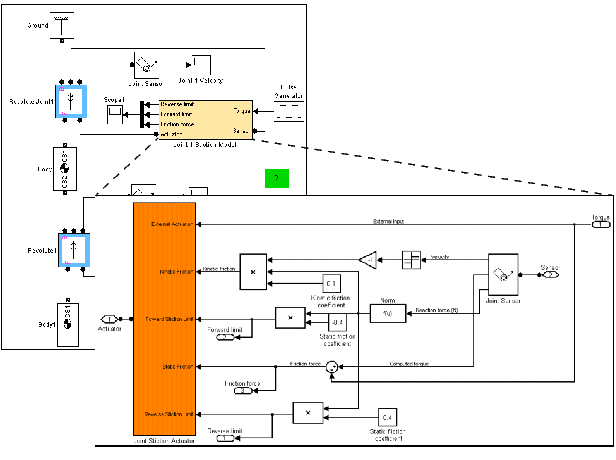
Joint Stiction Actuator Example: Mixed Static and Kinetic Friction
The mech_dpen_sticky model in the Demos library illustrates a driven double pendulum, with "sticky" friction or stiction applied to both revolute joints with the Joint Stiction Actuator block.
Open the unmasked Joint1 or Joint2 Stiction Model blocks (marked in yellow) to view the subsystems:
Each Stiction subsystem contains a Joint Stiction Actuator block (marked in orange) that requires static and kinetic friction coefficients via their respective blocks. For either revolute, an angular velocity threshold, specified through the block dialog, determines if a joint locks. Once locked, the joint cannot move until a combination of forces reaches a threshold specified by the Forward Stiction Limit or Reverse Stiction Limit.
Run the model with different kinetic and static friction coefficients and different velocity thresholds. View the results in the Scope blocks and through a visualization window. You can find more details on how stiction works in SimMechanics by consulting the Joint Stiction Actuator block reference page.
Actuating a Driver
Actuating a Driver allows you to specify the time dependence of the rheonomic constraint applied by the Driver.
Specifying Initial Positions and Velocities
The Joint Initial Condition Actuator (JICA) block allows you to specify the initial positions and velocities of unactuated joints and hence the bodies attached to them. You can use JICA blocks to
Using JICA Blocks
Specifying initial conditions on a joint is similar to actuating a joint. In fact, you can think of specifying initial conditions as a special kind of actuation: one that occurs only once at the beginning of simulation. That is why the JICA block resides in the Sensors & Actuators library.
| Note A JICA block, unlike other Actuators, does not have an input port. That is because the JICA's dialog box specifies the Actuator input. |
You must specify initial conditions separately for each desired translational and rotational DoF by connecting each corresponding prismatic and revolute primitive to a JICA. (You cannot specify ICs for weld and spherical primitives.)
To specify the initial velocity and/or position of a joint primitive:
| Note Do not connect the JICA block to the Joint ports marked "B" or "F" (base or follower). These ports are intended for connecting to Bodies. |
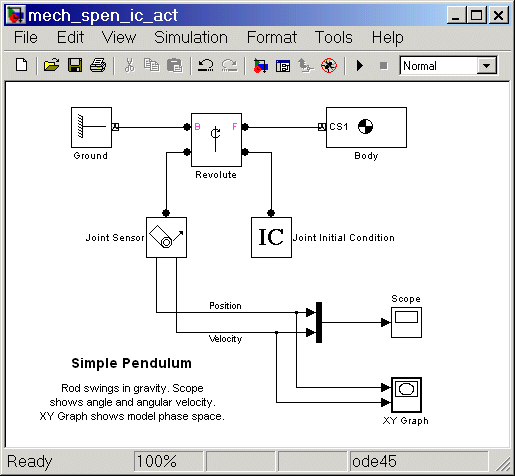
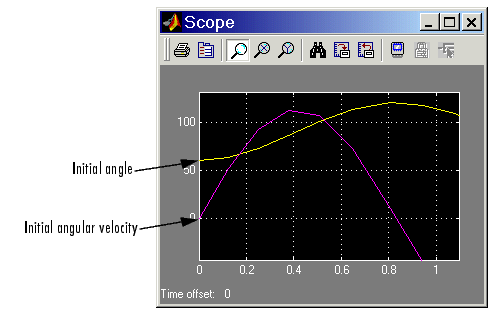
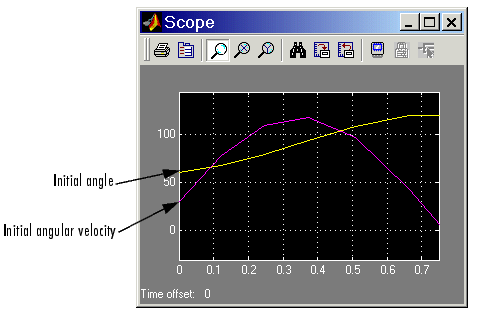
JICA Example: A Simple Pendulum
Open mech_spen from the Demos library, then open the Sensors & Actuators library. Follow the steps from the preceding section, Using JICA Blocks, to connect and configure one Joint Initial Condition Actuator block to the Revolute block. This Joint contains only one primitive, R1, which the Actuator automatically selects by default in this case.
Set the initial conditions in two ways and compare the resulting simulations in the Scope:
60 deg, which is 60o down from the left horizontal (30o left and up from vertically down), and the Initial velocity to 0 deg/s.
30 deg/s, leaving the Initial position (angle) at 60 deg.
The joint directionality is assigned in mech_spen so that the positive rotation axis is the +z-axis. Looking from the front, positive rotation swings down and right, counterclockwise.
| | Modeling Constraints and Drivers | Modeling Sensors | |