| SimMechanics | |
Creating a Joint
A joint must connect exactly two bodies. To create a joint between two bodies:
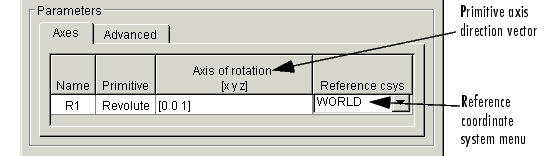
Directing Joint Axes
By default the prismatic and revolute axes of a joint point in the same direction as the z-axis of the World coordinate system. To change the direction of the axis of a joint primitive:
Creating Actuator and Sensor Ports on a Joint
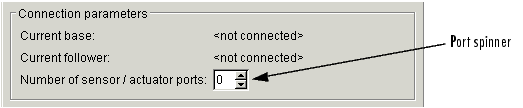
To create additional Connector Ports on a Joint for Actuators and Sensors, open the Joint's dialog box and set the Number of sensor/actuator ports to the number of Actuators and Sensors you plan to attach to the Joint.
Apply the setting by clicking OK or Apply.
Assembling Joints
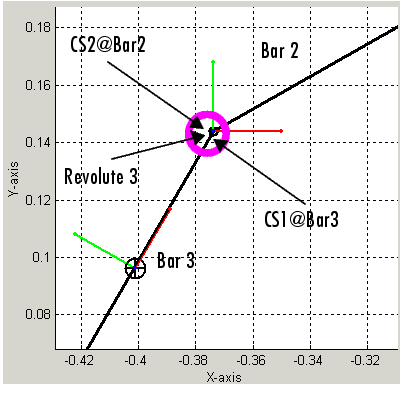
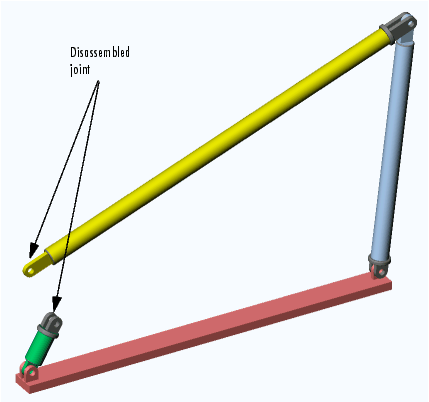
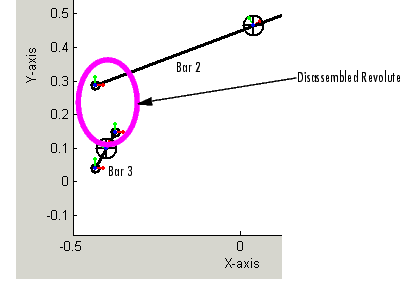
You must manually assemble all assembled joints in your model. Assembling a joint requires setting the initial positions of its base and follower attachment points such that they satisfy the assembly restrictions imposed by the joint (see Assembly Restrictions). Consider, for example, the model discussed in A Four Bar Mechanism in the Learning Basic Procedures chapter. This model comprises three bars connected by revolute joints to each other and to two ground points. The model collocates the CS origins of the Body CS ports connected to each Joint, thereby satisfying the assembly restrictions imposed by the revolute joints.
Assembled Revolute Joint in the Four Bar Mechanism
Modeling with Massless Connectors
Massless connectors simplify the modeling of machines that use a relatively light body to connect two relatively massive bodies. For example, you could use a Body block to model such a connector. But the resulting equations of motion might be ill-conditioned, because that connecting body's mass is small, and the simulation can be slow or error prone. Similarly, a massless connector avoids global inconsistencies that can arise if you use a Constraint block to model the connector.
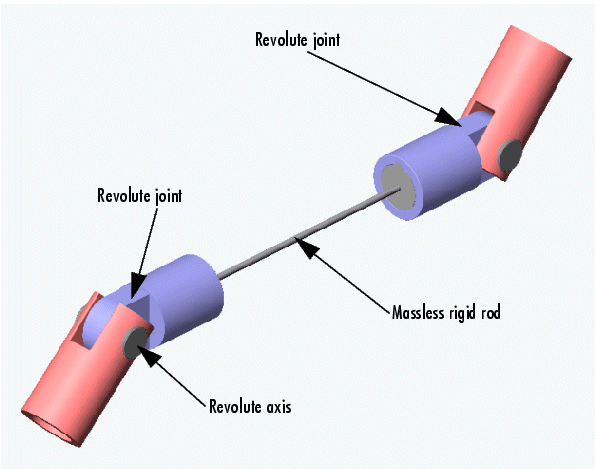
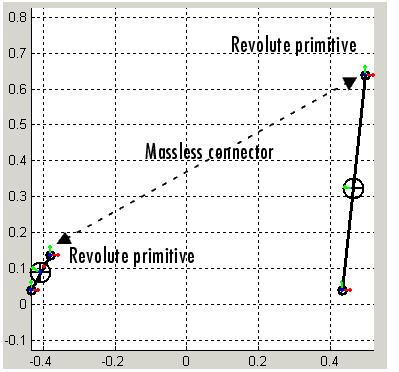
A massless connector consists of a pair of joints located a fixed distance apart. Think of a massless connector as a massless rod with a joint primitive affixed at each end.
The initial orientation and length of the massless connector are defined by a vector drawn from the base attachment point to the follower attachment point. During simulation, the orientation of the massless connector can change but not its length. In other words, the massless connector preserves the initial separation of the base and follower bodies during machine motion.
The SimMechanics Joints/Massless Connectors sublibrary contains three Massless Connectors:
You can set the direction of the axes of the revolute primitives.
Creating a Massless Connector
To create a massless connector between two bodies:
During simulation, the massless connector maintains the initial separation between the bodies though not necessarily the initial relative orientation.
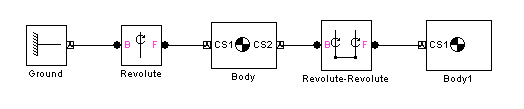
Massless Connector Example: Triple Pendulum
Consider a triple pendulum comprising massive upper and lower bodies and a middle body of negligible mass. The following model uses a Revolute-Revolute massless connector to model such a pendulum.
In this model, the joint axes of the Revolute-Revolute connector have their default orientation along the World z-axis. As a result, the lower arm (Body1) rotates parallel to the World's x-y plane.
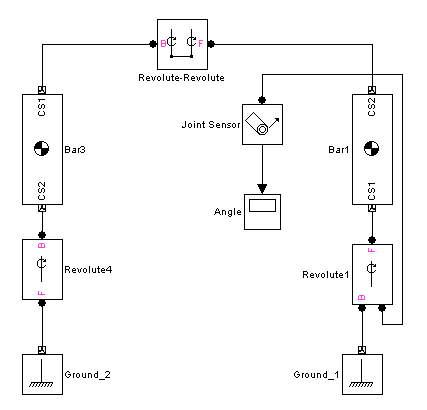
Massless Connector Example: Four Bar Mechanism
The following model replaces one of the bars (Bar2) in the mech_four_bar model from the Demos library with a Revolute-Revolute massless connector.
This model changes the Body CS origins of Bar3 to the following values.
| Name |
Origin position vector |
Translated from origin of |
CG |
[-0.027 0.048 0] |
CS1 |
CS1 |
[0.054 0.096 0] |
GND@Ground_2 |
CS2 |
[0 0 0] |
GND@Ground_2 |
This creates a separation between Bar3 and Bar1 equal to the length of Bar2 in the original model.
Try simulating both the original and the modified model. Notice that the massless connector version moves differently, because you eliminated the mass of Bar2 from the model. Notice also that the massless bar does not appear in the animation of the massless connector version of the model.
Modeling with Disassembled Joints
The SimMechanics Joints/Disassembled Joints sublibrary contains a set of joints that SimMechanics automatically assembles at the start of simulation; that is, SimMechanics positions the joints such that they satisfy the assembly restrictions imposed by the type of joint, e.g., prismatic or revolute. Using these joints eliminates the need for you to assemble the joints yourself.
Disassembled joints differ from assembled joints in significant ways. An assembled joint primitive has only one axis of translation or revolution or one spherical pivot point. A disassembled prismatic or revolute primitive has two axes of translation or rotation, one for the base and one for the follower body. A disassembled spherical primitive similarly has two pivot points.
| Note Disassembled joints can appear only in closed loops and each closed loop can contain only one disassembled joint. |
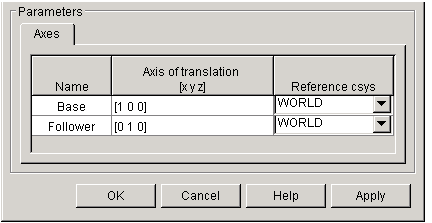
The dialog box for a disassembled joint allows you to specify the direction of each axis.
During model assembly, SimMechanics determines a common axis of revolution or translation that satisfies model assembly restrictions, and aligns the base and follower axes along the common axis.
Controlling Automatic Assembly
During model assembly, SimMechanics might move bodies connected by assembled joints from their initial positions in order to assemble the disassembled joints. SimMechanics' solution to the assembly problem cannot be predicted beforehand, except in simple cases. To prevent SimMechanics from moving bodies during model assembly, use Joint Initial Condition Actuator (JICA) blocks to specify the initial positions of bodies whose positions you want to remain fixed during the assembly process. This forces SimMechanics to find assembly solutions that satisfy the initial conditions specified by the JICA blocks.
Disassembled Joint Example: Four Bar Mechanism
This example creates and runs a model of a disassembled four bar machine.
Refer to the tutorial, A Four Bar Mechanism in the Learning Basic Procedures chapter, and the mech_four_bar demo:
Base and Follower axes, enter [0 0 1]. Close the dialog.
Cutting Closed Loops
Simulink cannot solve models whose block schematics contain closed loops. To simulate a model containing closed loops, SimMechanics internally converts a closed-loop model to an open-loop model, by cutting each of the model's closed loops once, at a Joint, Constraint, or Driver block.
You can specify the Joint to cut if the loop does not contain a disassembled joint. To do this, open the Joint's dialog box and select the Mark as the preferred cut joint option check box on the Advanced pane in that Joint's dialog Parameters area. If you do not specify a preference, Simulink cuts the loop at a Disassembled Joint block if the loop contains one; otherwise, at a Constraint or Driver block if the loop contains a Constraint block; otherwise, at the Joint that has the fewest degrees of freedom.
To display automatically cut joints, select the Mark automatically cut joints check box on the Constraints pane of the Mechanical Environment Settings dialog box (see Constraints Pane in the Running Mechanical Models chapter).
Refer to Modeling with Disassembled Joints for more on disassembled joints. Consult Checking Schematic Topology to see how SimMechanics analyzes closed loops in the model schematic.
| | Modeling Joints | Modeling Constraints and Drivers | |