| SimMechanics | |
Modeling Constraints and Drivers
The SimMechanics Constraints & Driver library provides a set of blocks to model constraints on the relative motions of two bodies. You model the constraint by connecting the appropriate Constraint or Driver block between the two bodies. As with joints, the blocks each have a base and follower Connector Port, with the body connected to the follower port viewed as moving relative to the body connected to the base port. For example, the following model constrains Body2 to move along a track that is parallel to the track of Body1.
The blocks enable you to model time-independent constraints or time-dependent drivers.
Holonomic constraint functions depend only on body positions, not velocities:

can sometimes be integrated into a form dependent only on positions; but if not, they are nonholonomic.
See the reference pages for information on the specific constraint that a Constraint or Driver block imposes.
Constraints and drivers can only remove degrees of freedom from a machine. Constraints and unactuated Drivers prevent the machine from moving in certain ways. Actuated Drivers externally impose a relative motion between pairs of bodies, and those pairs of bodies are no longer free to respond to externally applied forces or torques. See Counting Degrees of Freedom.
Directionality of Constraints and Drivers
Like joints, constraints and drivers have directionality. The sequence of base to follower body determines the directionality of the constraint or driver. The directionality determines how the sign of Driver Actuator signals affects the motion of the follower relative to the base and the sign of signals output by constraint and driver sensors.
Solving Constraints
When simulating a model, SimMechanics uses a constraint solver to find the motion, given the model's Constraint and Driver blocks. You can specify both the constraint solver type and the constraint tolerances that SimMechanics uses to find the constraint solution. See Choosing a Constraint Solver in the Running Mechanical Models chapter for more information.
Restrictions on Using Constraint and Driver Blocks
The following restrictions apply to the use of Constraint and Driver blocks in a model:
Constraint Example: Gear Constraint
The mech_gears model in the Demos library illustrates the Gear Constraint. Open the Body and Gear Constraint blocks.
Body1 and Body2 have their CG positions 2 meters apart. CS1 and CS2 on Body1 are collocated with the Body1 CG, and similarly, CS1 and CS2 on Body2 are collocated with the Body2 CG.
The Gear Constraint between them has two pitch circles. One is centered on the CS2 at the base Body, which is Body1, and has radius 1.5 meters. The other is centered on CS1 at the follower Body, which is Body2, and has radius 0.5 meters. The distance between CS2 on Body1 and CS1 on Body2 is 2 meters. The sum of the pitch circle radii equals this distance, as it must.
Visualizing the Gear Motion
The demo is set up to open the visualization feature automatically upon simulation start, with Handle Graphics and convex hulls, as explained in Viewing Machines with Handle Graphics in the Visualizing and Animating Machines chapter. Start the simulation and watch the CG CS axis triads spin around. The CG triad at Body2 rotates three times faster than the CG triad at Body1, because the pitch circle centered on Body2 is three times smaller.
You can see the same behavior in the Scope. The upper plot shows the motion of Revolute2, and the lower plot the motion of Revolute1. Note that angular motion is mapped to the interval (-180o, +180o] degrees.
The Gear Constraint is inside a closed loop formed by
Although Ground_1 and Ground_2 are distinct blocks, they represent different points on the same immobile ground at rest in World. So the blocks form a loop.
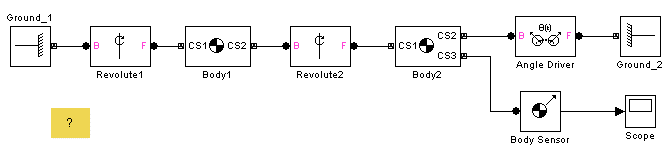
Driver Example: Using the Angle Driver
The following two models illustrate the Angle Driver, both with and without a Driver Actuator. The first is mech_angle_unact from the Demos library. Open the Body2 block.
The bodies form a double pendulum of two rods. The Body Sensor is connected to Body2 at CS3 = CS2 and measures all three components of Body2's angular velocity vector with respect to the ground.
The Angle Driver is connected between Body2 and Ground_2. Because the Angle Driver is not actuated in this model, it acts as a time-independent constraint to hold the angle between Body2 and Ground_2 constant at its initial value during the simulation.
Visualizing the Angle Driver Motion
The demo is set up to open the visualization feature automatically upon simulation start, with Handle Graphics and convex hulls, as explained in Viewing Machines with Handle Graphics in the Visualizing and Animating Machines chapter. Start the simulation. The upper body swings like a pendulum, but the lower body maintains its horizontal orientation with respect to the horizontal ground. The Scope measures Body2's angular velocity with respect to ground, and this remains at zero.
The second model is mech_angle_act from the Demos library. Open the Driver Actuator block.
The Driver Actuator drives the Angle Driver block. The Actuator accepts a constant angular velocity signal from the Simulink blocks. The Actuator also requires the angle itself and the angular acceleration, together with the angular velocity, in a vector signal format.
The Body Sensor again measures three components of Body2's angular velocity with respect to the ground. Constant1 drives the angle at 15o/second. While the simulation is running, this angle changes at the constant rate. But at the same time, the assembly and the constant length of the two pendulum rods must be maintained by Simulink, while both rods are subject to gravity. These requirements slow the simulation down, as they require increasing computing power to maintain all of them simultaneously.
As in the Gear Constraint model, the two Ground blocks in these models represent points on the same immobile ground at rest in World, so the Angle Driver is part of a closed loop.
| | Creating a Joint | Modeling Actuators | |