| Plot Editor | Search Help Desk |
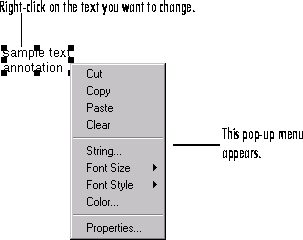
Changing Text
To change text:String
After selecting String from the pop-up menu, an edit box appears around the text. Make changes to the text and then click outside of the text edit box to see the changes. Another way to edit a text string is by double-clicking on the text. Making a Multiline Axis Label. First add an axis label using the Axes Properties dialog box. Then edit the label as a text string to create a multiline label. Subsequently, when you are in the Axes Property dialog box, you will only see the first line in the Label field. To see additional lines in the label field, click in the field and press the down arrow key. Special Characters. To create special characters in a text string, such as Greek letters, mathematical symbols, superscripts and subscripts, use embedded TeX sequences. For example,\pi creates  . See the
 String property of the text command for a list of supported TeX sequences, and see Example - Including Text with Special Characters.
Font Size
After selecting Font Size from the pop-up menu, select a font size from the list, or select More..., which displays the Font Properties dialog box where you can specify a different size. The default font size is 10 points.Font Style
After selecting Font Style from the pop-up menu, select normal, bold, or italic. You can also specify these styles, as well as bold italic, from the Font Properties dialog box.Font Color
After selecting Color from the pop-up menu, the Color dialog box opens. Select one of the predefined colors or define a custom color. The default color for text is black.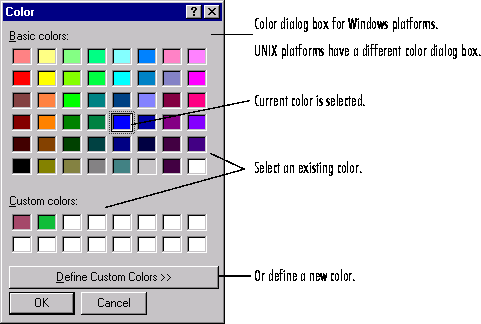
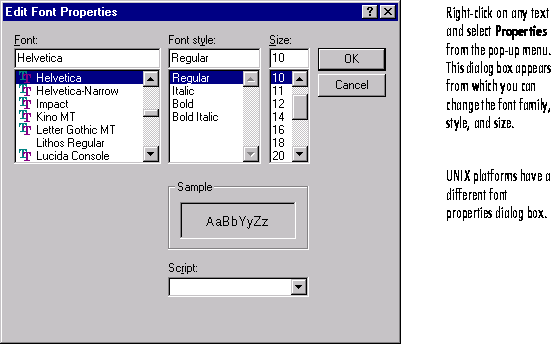
Font Properties
After selecting Properties from the pop-up menu, the Edit Font Properties dialog box appears. In the dialog box, change the font family (the default family is Helvetica), the font style, or the size. Then click OK.