Example - Changing Text, Arrows, and Lines
Add another text annotation and make changes to the annotations for the Lotka-Volterra model you created and annotated in Example - Adding Annotations.
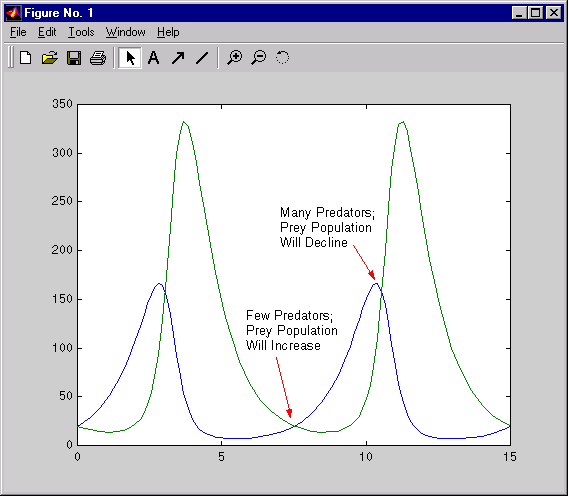
After making these changes, the annotations will look like those in the figure below.
- 1
- Start plot edit mode.
- 2
- Add another text annotation by copying and editing the annotation you
already made in Example - Adding Annotations.
- Right-click on the text annotation you already made.
- Select Copy from the pop-up menu.
- Move the cursor to the approximate location where you want the second
text annotation to appear.
- Right-click and select Paste.
- Change the text: double-click the annotation you just pasted, select the
word
Many, and over it, type Few. Then select the word Decline, and over
it, type Increase.
- Click outside of the annotation area to see the changes.
- 3
- Make the text annotations appear in bold.
- Shift-click on the two text annotations so that both are selected.
- Right-click on any selected annotation text, select Font Style from the
pop-up menu, and select bold.
- The text appears in bold.
- 4
- Change the color of the arrow annotation to red.
- Right-click on the arrow annotation.
- Select Color from the pop-up menu.
- In the Color dialog box, select a red color and click OK.
- The arrow is red.
- 5
- Copy the red arrow to point to the second annotation.
- Right-click on the arrow annotation.
- Select Copy from the pop-up menu.
- Move the cursor to the approximate location where you want the second
arrow annotation to appear.
- Right-click and select Paste.
- 6
- If you need to, drag the annotations to adjust their positions, or drag the
arrow's handle to change the annotation's size.
[ Previous | Help Desk | Next ]