

| Partial Differential Equation Toolbox | |
PDE Toolbox graphical user interface (GUI)
Syntax
Description
pdetool
provides the graphical user interface (GUI) for the PDE Toolbox. Call pdetool without arguments to start the application. You should not call pdetool with arguments.
The GUI helps you to draw the 2-D domain and to define boundary conditions for a PDE problem. It also makes it possible to specify the partial differential equation, to create, inspect and refine the mesh, and to compute and display the solution from the GUI.
pdetool contains several different modes:
In Draw mode, you construct a Constructive Solid Geometry model (CSG model) of the geometry. You can draw solid objects that can overlap. There are four types of solid objects:
The solid objects can be moved and rotated. Operations apply to groups of objects by doing multiple selects. (A Select all option is also available.) You can cut and paste among the selected objects. The model can be saved and restored. pdetool can be started by just typing the name of the model. (This starts the corresponding M-file that contains the MATLAB commands necessary to create the model.)
The solid objects can be combined by typing a set formula. Each object is automatically assigned a unique name, which is displayed in the GUI on the solid object itself. The names refer to the object in the set formula. More specifically, in the set formula, the name refers to the set of points inside the object. The resulting geometrical model is the set of points for which the set formula evaluates to true. (For a description of the syntax of the set formula, see decsg.) By default, the resulting geometrical model is the union of all objects.
A "snap-to-grid" function is available. This means that objects align to the grid. The grid can be turned on and off, and the scaling and the grid spacing can be changed.
In boundary mode, you can specify the boundary conditions. You can have different types of boundary conditions on different boundaries. In this mode, the original shapes of the solid building objects constitute borders between subdomains of the model. Such borders can be eliminated in this mode. The outer boundaries are color coded to indicate the type of boundary conditions. A red outer boundary corresponds to Dirichlet boundary conditions, blue to generalized Neumann boundary conditions, and green to mixed boundary conditions. You can return to the boundary condition display by clicking the  button or by selecting Boundary Mode from the Boundary menu.
In PDE mode, you can specify the type of PDE problem, and the coefficients c, a, f, and d. You can specify the coefficients for each subdomain independently. This makes it easy to specify, e.g., various material properties in one PDE model. The PDE to be solved can be specified by clicking the PDE button or by selecting PDE Specification . . . from the PDE menu. This brings up a dialog box.
In Mesh mode, you can control the automated mesh generation and plot the mesh. An initial mesh can be generated by clicking the  button or by selecting Initialize Mesh from the Mesh menu. The initial mesh can be repeatedly refined by clicking the refine button or by selecting Refine Mesh from the Mesh menu.
In Solve mode, you can specify solve parameters and solve the PDE. For parabolic and hyperbolic PDE problems, you can also specify the initial conditions, and the times at which the output should be generated. For eigenvalue problems, the search range can be specified. Also, the adaptive and nonlinear solvers for elliptic PDEs can be invoked. The PDE problem is solved by clicking the = button or by selecting Solve PDE from the Solve menu. By default, the solution is plotted in the pdetool axes.
In Plot mode you can select a wide variety of visualization methods such as surface, mesh, contour, and quiver (vector field) plots. For surface plots, you can choose between interpolated and flat rendering schemes. The mesh can be hidden in all plot types. For parabolic and hyperbolic equations, you can animate the solution as it changes with time. You can show the solution both in 2-D and 3-D. 2-D plots are shown inside pdetool. 3-D plots are plotted in separate figure windows. Different types of plots can be selected by clicking the button with the solution plot icon or by selecting Parameters . . . from the Plot menu. This opens a dialog box.
Boundary Condition Dialog Box
In this dialog box, the boundary condition for the selected boundaries is entered.The following boundary conditions can be handled:
 on the boundary.
 is the outward unit length normal.
The boundary conditions can be entered in a variety of ways. (See assemb and Boundary Menu.)
PDE Specification Dialog Box
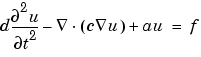
In this dialog box, the type of PDE and the PDE coefficients are entered. The following types of PDEs can be handled:
for x and y on the problem's 2-D domain  .
.
The PDE coefficients can be entered in a variety of ways. (See assempde and PDE Menu.)
Model M-File
The Model M-file contains the MATLAB commands necessary to create a CSG model. It can also contain additional commands to set boundary conditions, define the PDE, create the mesh, solve the pde, and plot the solution. This type of M-file can be saved and opened from the File menu.
The Model M-file is a MATLAB function and not a script. This way name clashes between variables used in the function and in the main workspace are avoided. The name of the file must coincide with the model name. The beginning of the file always looks similar to the code fragment below:
function pdemodel
pdeinit;
pde_fig=gcf;
ax=gca;
pdetool('appl_cb',1);
setuprop(pde_fig,'currparam',str2mat('1.0','0.0','10.0','1.0'))
;
pdetool('snapon');
set(ax,'AspectRatio',[1.5 1]);
set(ax,'XLim',[-1.5 1.5]);
set(ax,'YLim',[-1 1]);
set(ax,'XTickMode','auto');
set(ax,'YTickMode','auto');
grid on;
The pdeinit command starts up pdetool. If pdetool has already been started, the current model is cleared. The following commands set up the scaling and tick marks of the axis of pdetool and other user parameters.
Then a sequence of drawing commands is issued. The commands that can be used are named pdecirc, pdeellip, pdepoly, and pderect. The command sequence below creates the L-shaped membrane as the union of three squares. The solid objects are given names SQ1, SQ2, SQ3, etc.
% Geometry description:
pderect([-1 0 0 -1],'SQ1');
pderect([0 1 0 -1],'SQ2');
pderect([0 1 1 0],'SQ3');
We do not intend to fully document the format of the Model M-file. It can be used to change the geometry of the drawn objects, since the pdecirc, pdeellip, pdepoly, and pderect commands are documented.
See Also
initmesh, assempde, parabolic, wave, pdeeig, pdesurf, pdecont
| | pdesurf | pdetrg | |
 · (c
· (c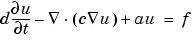
 du
du