| SimPowerSystems | |
Session 4: Introducing Power Electronics
The Power System Blockset has been designed to simulate power electronic devices. In this session, you build a simple circuit using thyristors.
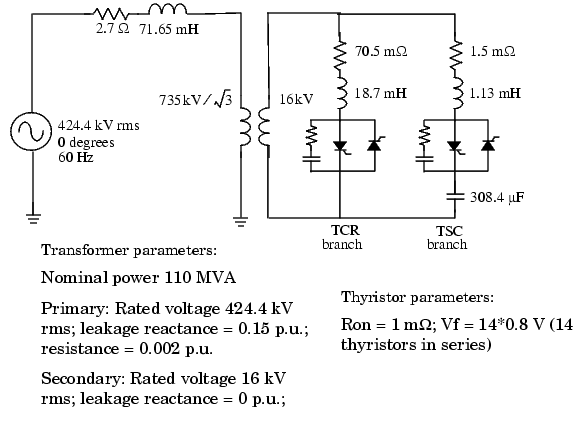
Consider the circuit shown below. It represents one phase of a static var compensator (SVC) used on a 735 kV transmission network. On the secondary of the 735 kV /16 kV transformer, two variable susceptance branches are connected in parallel: one thyristor controlled reactor (TCR) branch and one thyristor switched capacitor (TSC) branch.
Figure 1-8: One Phase of a TCR/TSC Static Var Compensator
The TCR and TSC branches are both controlled by a valve consisting of two thyristor strings connected in antiparallel. An RC snubber circuit is connected across each valve. The TSC branch is switched on/off, thus providing discrete step variation of the SVC capacitive current. The TCR branch is phase controlled in order to obtain a continuous variation of the net SVC reactive current.
You will now build two circuits illustrating the operation of the TCR and the TSC branches.
Simulation of the TCR Branch
circuit3.
circuit3 model.
Ron=1e-3; Lon=0; Vf=14*0.8; Rs=500; Cs=0.15e-6
Notice that the snubber circuit is integral to the Thyristor dialog box.
Th1 and duplicate it.
The linear transformer is located in the Elements library. Copy it, rename it to TrA, and open its dialog box. Set its nominal power, frequency, and winding parameters (winding 1 = primary; winding 2 = secondary) as shown in Figure 1-8.
Note that the leakage reactance and resistance of each winding have to be specified directly in per unit quantities. As there is no tertiary winding, enter 0 in the field corresponding to winding 3. Notice that winding 3 disappears on the TrA block.
Finally, set the magnetizing branch parameters Rm and Xm at [500, 500]. These values correspond to 0.2% resistive and inductive currents as specified in Figure 1-8.
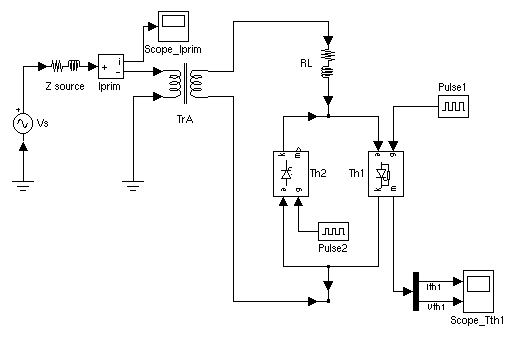
Add a voltage source, series RL elements, and a ground block. Set the parameters as shown in Figure 1-8. Add a current measurement to measure the primary current. By using appropriate connectors, you should be able to interconnect the circuit as shown in Figure 1-9.
Notice that the Thyristor blocks have an output identified by the letter m. This output returns a Simulink vectorized signal containing the thyristor current (Iak) and voltage (Vak). Connect a Demultiplexer block with two outputs at the m output of Th1. Then connect the two multiplexer outputs to a dual trace scope that you rename Scope_Th1. (To create a second input to your scope, in the Scope properties --> General menu item, set the number of axes to 2.) Label the two connection lines Ith1 and Vth1. These labels are automatically displayed on the top of each trace.
Figure 1-9: Simulation of the TCR Branch
You can now model the synchronized pulse generators firing thyristors Th1 and Th2. Copy two Simulink pulse generators into your system, name them Pulse1 and Pulse2, and connect them to the gates of Th1 and Th2.
Now you have to define the timing of the Th1 and Th2 pulses. At every cycle a pulse has to be sent to each thyristor  degrees after the zero crossing of the thyristor commutation voltage. Set the pulse1 and pulse2 parameters as follows:
Period : 1/60 s
Duty cycle: 1% (3.6 degrees pulses)
Amplitude :1
Start time : 1/60+T for Pulse1; 1/60+1/120+T for Pulse2
The pulses sent to Th1 are delayed by 180 degrees with respect to pulses sent to Th2. The delay T is used to specify the firing angle. In order to get a 120 degrees firing angle, specify T in the workspace by entering
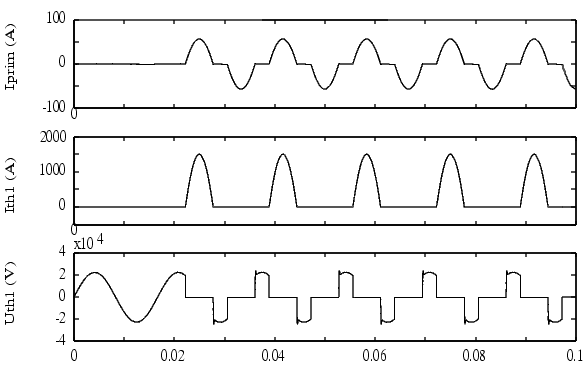
Now open the Simulation --> Simulation parameters dialog. Select the ode23tb integration algorithm. Keep the default parameters but set the relative tolerance to 1e-4 and the stop time to 0.1. Start the simulation. The results are shown in Figure 1-10.
| Note You could also choose to discretize your system. Try for example 50 µs sample time. The simulation results should compare well with the continuous system. |
Figure 1-10: TCR Simulation Results
Simulation of the TSC Branch
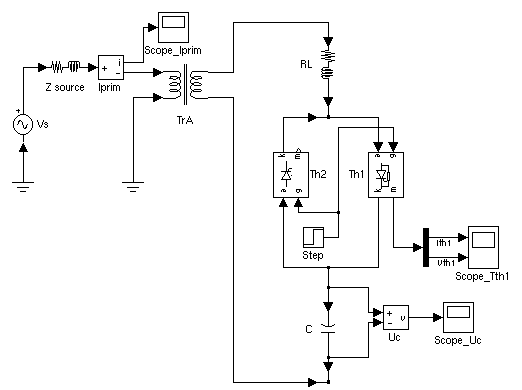
You can now modify your circuit3 system and change the TCR branch to a TSC branch. Save circuit3 as a new system and name it circuit4.
Connect a capacitor in series with the RL inductor and Th1/Th2 valve as shown in Figure 1-11. Change the R, L, and C parameters as shown in Figure 1-8. Connect a voltmeter and scope to monitor the voltage across the capacitor.
Contrary to the TCR branch, which was fired by a synchronous pulse generator, a continuous firing signal is now applied to the two thyristors. Delete the two pulse generators. Copy a Step block from the Simulink library and connect its output at both gates of Th1 and Th2. Set its step time at 1/60/4 (energizing at the first positive peak of the source voltage). Your circuit should now be similar to the one shown here.
Figure 1-11: Simulation of the TSC Branch
Open the three scopes and start the simulation.
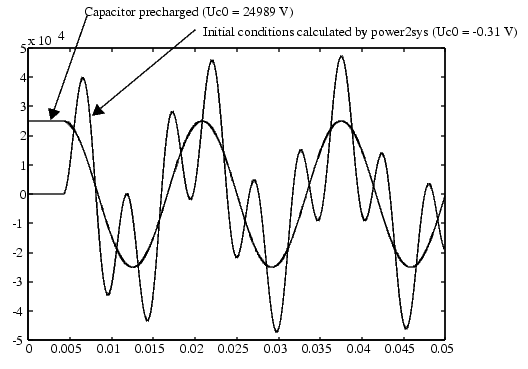
As the capacitor is energized from zero, you can observe a low damping transient at 200 Hz, superimposed with the 60 Hz component in the capacitor voltage and primary current. During normal TSC operation, the capacitor has an initial voltage left since the last valve opening. In order to minimize the closing transient with a charged capacitor, the thyristors of the TSC branch must be fired when the source voltage is at maximum value and with the correct polarity. The initial capacitor voltage corresponds to the steady-state voltage obtained when the thyristor switch is closed. The capacitor voltage is 17.67 kVrms when the valve is conducting. At the closing time, the capacitor must be charged at the peak voltage.
You can now use the Powergui block to change the capacitor initial voltage. Open the powergui. In the Tools menu, select Initial Values of State Variables --> Display or Set Initial Conditions. A list of all the state variables with their default initial values appears. The value of the initial voltage across the capacitor C (variable Uc_C) should be -0.3141 V. This voltage is not exactly zero because the snubber allows circulation of a small current when both thyristors are blocked. Now select the Uc_C state variable and enter 24989 in the upper right field. Then click the Apply button in order to make this change effective.
Start the simulation. As expected the transient component of capacitor voltage and current has disappeared. The voltages obtained with and without initial voltage are compared in this plot.
Figure 1-12: Transient Capacitor Voltage With and Without Initial Charge
| | Discretizing the Electrical System | Session 5: Simulating Motor Drives | |