| Embedded Target for Motorola MPC555 | |
The Example Model
In this tutorial we will use a simple example model, mpc555rt_led, from the directory matlabroot/toolbox/rtw/targets/mpc555dk/mpc555demos.
This directory is on the default MATLAB path.
Figure 3-1: mpc555rt_led_demo Model, Root Level
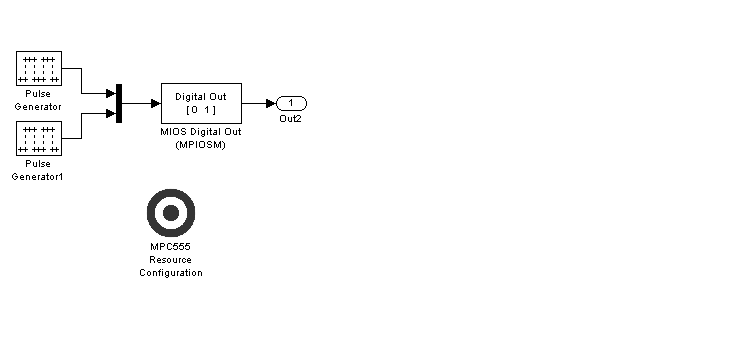
TargetSystem subsystem, from which we will generate code.
Figure 3-2: TargetSystem Subsystem
In the TargetSystem subsystem, two square wave signals are multiplexed and routed to the MIOS Digital Out block. The MIOS Digital Out block accepts a vector of numbers representing pins 0-15 on the MIOS 16-bit Parallel Port I/O Submodule (MPIOSM) on the MPC555. As the square wave signals oscillate between 0 and 1, the MIOS Digital Out block writes corresponding logic values to the appropriate pin on the port.
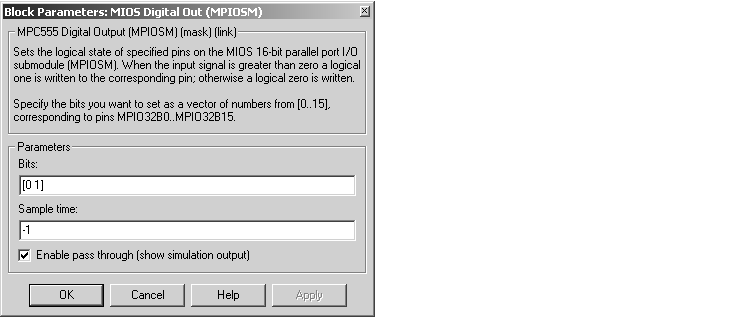
This picture shows the parameters of the MIOS Digital Out block.
The Bits field is set to the vector [0 1]. The block maps this vector to the MPC555 MIOS digital output pins MPIO32B0 and MPIO32B1. When the application runs, it will send a pulse signal to these output pins. On the PhyCORE-MPC555 board, these signals are connected to two of the LEDs, which will switch on and off at the frequency set in the respective pulse generator blocks.
During simulation, the MIOS Digital Out block simply passes its input signal through to its output, and the square waves can be viewed on the Scope block.
In addition to the Pulse Wave, Mux, MIOS Digital Out, and Output blocks, the TargetSystem subsystem contains a MPC555 Resource Configuration object. When building a model with driver blocks from the Embedded Target for Motorola MPC555 library, you must always place a MPC555 Resource Configuration object into the model (or the subsystem from which you want to generate code) first.
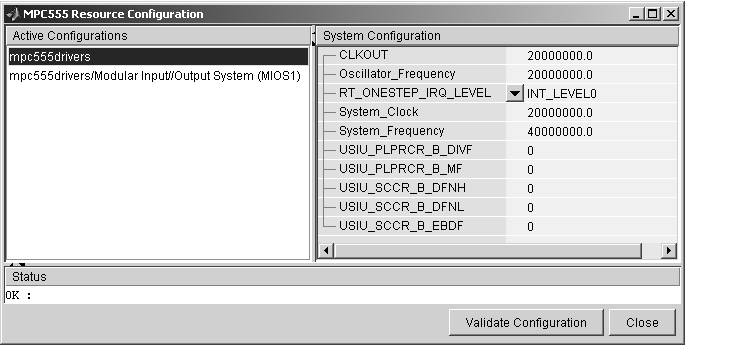
The purpose of the MPC555 Resource Configuration object is to provide information to other blocks in the model. Unlike conventional blocks, the MPC555 Resource Configuration object is not connected to other blocks via input or output ports. Instead, driver blocks (such as the MIOS Digital Out block in the example model) query the MPC555 Resource Configuration object for required information.
For example, a driver block may need to find the system clock speed that is configured in the MPC555 Resource Configuration object. The MPC555 has a number of clocked subsystems; to generate correct code, driver blocks need to know the speeds at which the these clock busses will run.
The MPC555 Resource Configuration window lets you examine and edit the MPC555 Resource Configuration settings. To open the MPC555 Resource Configuration window, double-click on the MPC555 Resource Configuration icon. This picture shows the MPC555 Resource Configuration window for the TargetSystem subsystem.
In this tutorial, we will use the default MPC555 Resource Configuration settings. Observe, but do not change, the parameters in the MPC555 Resource Configuration window. To learn more about the MPC555 Resource Configuration object, see MPC555 Resource Configuration.
Close the MPC555 Resource Configuration window before proceeding.
| | Before You Begin | Using the Pass-Through Option in Simulation | |