| Mapping Toolbox | |
Fixing Position
The fundamental objective of navigation is to determine at a given moment how to proceed to your destination, avoiding hazards on the way. The first step in accomplishing this is to establish your current position. Early sailors kept within sight of land to facilitate this. Today, navigation within sight (or radar range) of land is called piloting. Positions are fixed by correlating the bearings and/or ranges of landmarks. In real-life piloting, all sighting bearings are treated as rhumb lines, while in fact they are actually great circles.
Over the distances involved with visual sightings (up to 20 or 30 nautical miles), this assumption causes no measurable error and it provides the significant advantage of allowing the navigator to plot all bearings as straight lines on a Mercator projection.
The Mercator was designed exactly for this purpose. Range circles, which might be determined with a radar, are assumed to plot as true circles on a Mercator chart. This allows the navigator to manually draw the range arc with a compass.
These assumptions also lead to computationally efficient methods for fixing positions with a computer. The Mapping Toolbox includes the navfix function, which mimics the manual plotting and fixing process using these assumptions.
To obtain a good navigational fix, your relationship to at least three known points is considered necessary. A questionable or poor fix can be obtained with two known points.
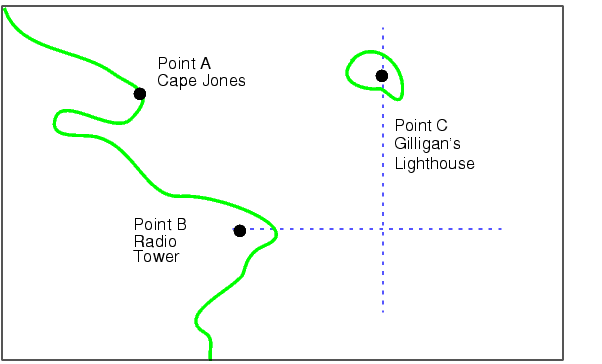
Some Possible Situations
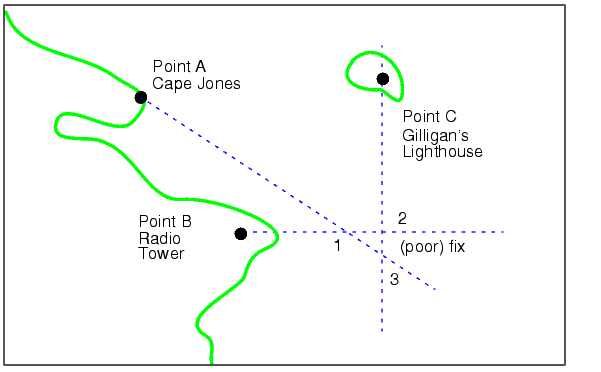
In this imaginary coastal region, you take a visual bearing on the radio tower of 270°. At the same time, Gilligan's Lighthouse bears 0°. If you plot a 90°-270° line through the radio tower, and a 0°-180° line through the lighthouse on your Mercator chart, the point at which the lines cross is a fix. Since you have used only two lines, however, its quality is questionable.
But wait; your port lookout says he took a bearing on Cape Jones of 300°. If that line exactly crosses the point of intersection of the first two lines, you will have a perfect fix.
Whoops. What happened? Is your lookout in error? Possibly, but perhaps one or both of your bearings was slightly in error. This happens all the time. Which point, 1, 2, or 3, is correct? As far as you know, they are all equally valid.
In practice, the little triangle is plotted, and the fix position is taken as either the center of the triangle or the vertex closest to a danger (like shoal water). If the triangle is large, the quality is reported as poor, or even as no fix. If a fourth line of bearing is available, it can be plotted to try to resolve the ambiguity. When all three lines appear to cross at exactly the same point, the quality is reported as excellent or perfect.
Notice that three lines resulted in three intersection points. Four lines would return six intersection points. This is a case of combinatorial counting. Each intersection corresponds to choosing two lines to intersect from among n lines, so the total number of intersection points will be n-choose-2.
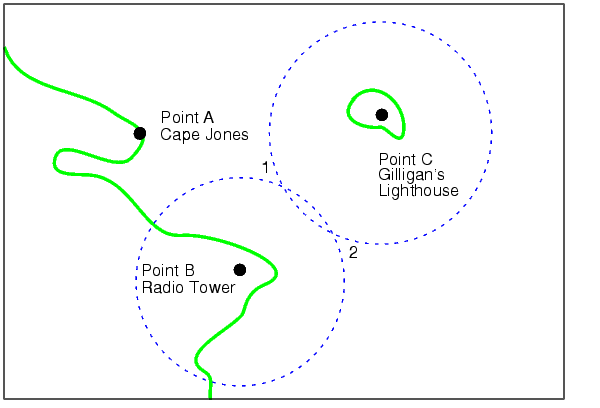
The next time you traverse these straits, it is a very foggy morning. You can't see any landmarks, but luckily, your navigational radar is operating. Each of these landmarks has a good radar signature, so you're not worried. You get a range from the radio tower of 14 nautical miles and a range from the lighthouse of 15 nautical miles.
Now what? You took ranges from only two objects, and yet you have two possible positions. This ambiguity arises from the fact that circles can intersect twice.
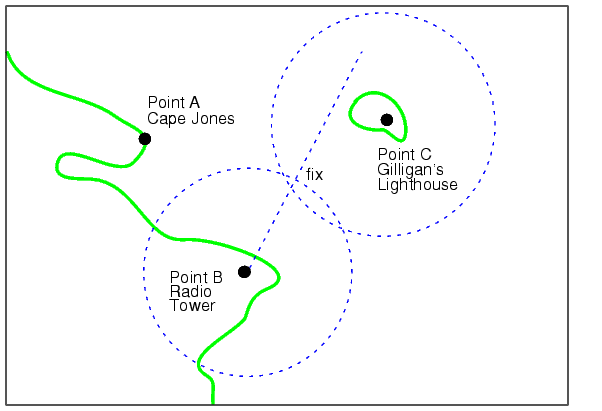
Luckily, your radar watch reports that he has Cape Jones at 18 nautical miles. This should resolve everything.
You were lucky this time. The third range resolved the ambiguity and gave you an excellent fix. Three intersections practically coincide. Sometimes the ambiguity is resolved, but the fix is still poor because the three closest intersections form a sort of circular triangle.
Sometimes the third range only adds to the confusion, either by bisecting the original two choices, or by failing to intersect one or both of the other arcs at all. In general, when n arcs are used, 2x(n-choose-2) possible intersections result. In this example, it is easy to tell which ones are right.
Bearing lines and arcs can be combined. If instead of reporting a third range, your radar watch had reported a bearing from the radar tower of 20°, the ambiguity could have also been resolved. Note, however, that in practice, lines of bearing for navigational fixing should only be taken visually, except in desperation. A radar's beamwidth can be a degree or more, leading to uncertainty.
As you begin to wonder whether this manual plotting process could be automated, your first officer shows up on the bridge with a laptop and the Mapping Toolbox.
Using navfix
The navfix command can be used to determine the points of intersection between any number of lines and arcs. Be warned, however, that due to the combinatorial nature of this process, the computation time grows rapidly with the number of objects. To illustrate this function, assign positions to the landmarks. Point A, Cape Jones, is at (latA,lonA). Point B, the radio tower, is at (latB,lonB). Point C, Gilligan's Lighthouse, is at (latC,lonC).
For the bearing-lines-only example, the syntax is:
This defines the three points and their bearings as taken from the ship. The outputs would look something like this, with actual numbers of course:
latfix =
    latfix1       NaN          % A intersecting B
    latfix2       NaN          % A intersecting C
    latfix3       NaN          % B intersecting C
lonfix =
    lonfix1       NaN          % A intersecting B
    lonfix2       NaN          % A intersecting C
    lonfix3       NaN          % B intersecting C
Notice that these are two-column matrices. The second column consists of NaNs because it is used only for the two-intersection ambiguity associated with arcs.
For the range-arcs-only example, the syntax is:
This defines the three points and their ranges as taken from the ship. The final argument indicates that the three cases are all ranges.
The outputs have the following form:
latfix =
    latfix11  latfix12          % A intersecting B
    latfix21  latfix22          % A intersecting C
    latfix31  latfix32          % B intersecting C
lonfix =
    lonfix11  lonfix12          % A intersecting B
    lonfix21  lonfix22          % A intersecting C
    lonfix31  lonfix32          % B intersecting C
Here, the second column is used, because each pair of arcs has two potential intersections.
For the bearings and ranges example, the syntax requires the final input to indicate which objects are lines of bearing (indicated with a 1) and which are range arcs (indicated with a 0):
The resulting output is mixed:
latfix =
    latfix11       NaN          % Line B intersecting Arc B
    latfix21  latfix22          % Line B intersecting Arc C
    latfix31  latfix32          % Arc B intersecting Arc C
lonfix =
    lonfix11       NaN          % Line B intersecting Arc B
    lonfix21  lonfix22          % Line B intersecting Arc C
    lonfix31  lonfix32          % Arc B intersecting Arc C
Only one intersection is returned for the line from B with the arc about B, since the line originates inside the circle and intersects it once. The same line intersects the other circle twice, and hence it returns two points. The two circles taken together also return two points.
Usually, you have an idea as to where you are before you take the fix. For example, you might have a dead reckoning position for the time of the fix (see below). If you provide navfix with this estimated position, it will choose from each pair of ambiguous intersections the point closest to the estimate. Here's what it might look like:
[latfix,lonfix] = navfix([latBlatBlatC],[lonBlonBlonC],... [20 14 15],[1 0 0],drlat,drlon) latfix = latfix11 % the only point latfix21 % the closer point latfix31 % the closer point lonfix = lonfix11 % the only point lonfix21 % the closer point lonfix31 % the closer point
A Numerical Example of Using navfix
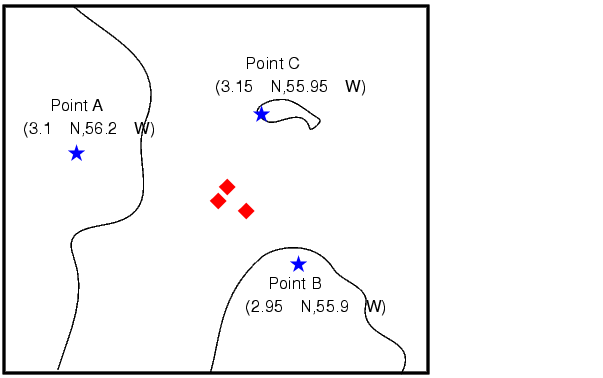
For a numerical example, define some specific points in the middle of the Atlantic Ocean. These are strictly arbitrary; perhaps they correspond to points in Atlantis:
Plot them on a Mercator projection:
axesm('MapProjection','mercator','Frame','on',...
    'MapLatLimit',[2.8 3.3],'MapLonLimit',[-55.8 -56.3])
plotm([lata latb latc],[lona lonb lonc],...
    'LineStyle','none','Marker','pentagram',...
    'MarkerEdgeColor','b','MarkerFaceColor','b',...
    'MarkerSize',12)
Here's what it looks like (the labeling and imaginary coastlines are added after the fact for illustration):
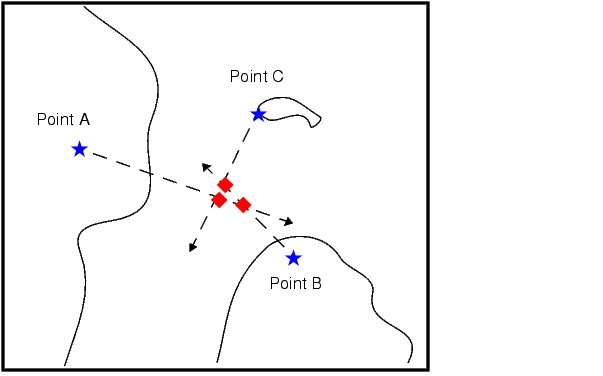
Take three visual bearings: Point A bears 289°, Point B bears 135°, and Point C bears 026.5°. Calculate the intersections:
[newlat,newlong] = navfix([lata latb latc],[lona lonb lonc],...
                          [289 135 26.5],[1 1 1])
newlat =
    3.0214       NaN
    3.0340       NaN
    3.0499       NaN
newlong =
    -55.9715       NaN
    -56.0079       NaN
    -56.0000       NaN
Add the bearing lines and intersection points to the map:
plotm(newlat,newlong,'LineStyle','none',...
    'Marker','diamond','MarkerEdgeColor','r',...
    'MarkerFaceColor','r','MarkerSize',9)
Notice that each pair of objects results in only one intersection, since all are lines of bearing.
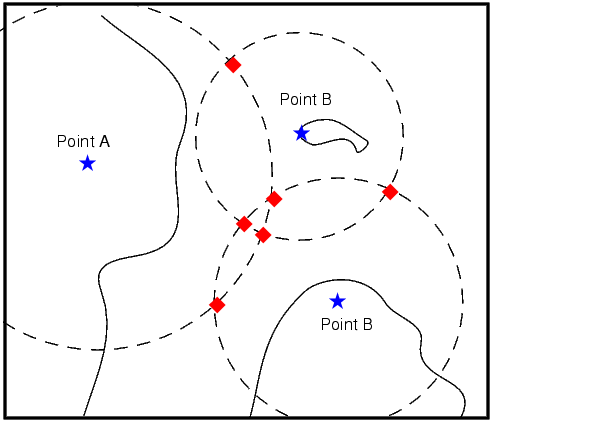
What if instead, you had ranges from the three points, A, B, and C, of 13nm, 9nm, and 7.5nm, respectively.
[newlat,newlong] = navfix([lata latb latc],[lona lonb lonc],...
                          [13 9 7.5],[0 0 0])
newlat =
    3.0739    2.9434
    3.2413    3.0329
    3.0443    3.0880
newlong =
    -55.9846  -56.0501
    -56.0355  -55.9937
    -56.0168  -55.8413
Here's what these points look like:
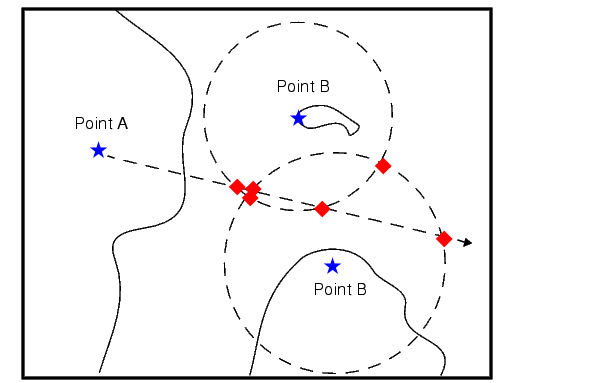
Three of these points look reasonable, three do not. What if, instead of a range from Point A, you had a bearing to it of 284°?
[newlat,newlong] = navfix([lata latb latc],[lona lonb lonc],...
                          [284 9 7.5],[1 0 0])
newlat =
    3.0526    2.9892
    3.0592    3.0295
    3.0443    3.0880
newlong =
    -56.0096  -55.7550
    -56.0360  -55.9168
    -56.0168  -55.8413
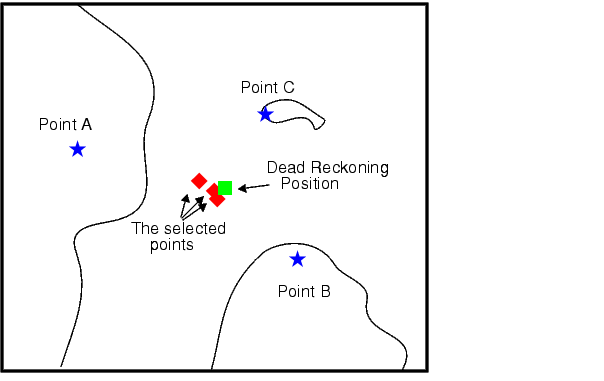
Again, visual inspection of the results indicates which three of the six possible points seem like reasonable positions. When using the dead reckoning position (3.05°N,56.0°W), the closer, more reasonable candidate from each pair of intersecting objects is chosen:
drlat = 3.05; drlon = -56;
[newlat,newlong] = navfix([lata latb latc],[lona lonb lonc],...
                          [284 9 7.5],[1 0 0],drlat,drlon)
newlat =
    3.0526
    3.0592
    3.0443
newlong =
    -56.0096
    -56.0360
    -56.0168
| | Conventions for Navigational Functions | Planning | |