| Dials & Gauges Blockset | |
Using Multiple Styles Within One Block
Some ActiveX control properties let you use more than one style for a given component or characteristic, in the same block. For example, you might use multiple styles to create
These sections discuss the use of multiple styles in preconfigured Dials & Gauges Blockset blocks:
Blocks that Use Multiple Styles by Default
Many Dials & Gauges blocks include multiple styles by default:
Determining When Multiple Styles Are Allowed
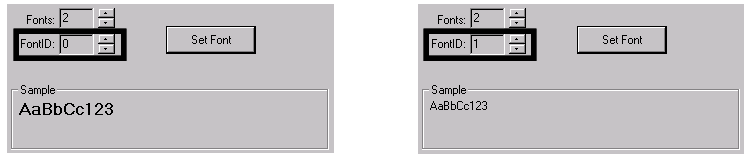
If a component supports multiple styles, then its property dialog box has properties that allow you to set the number of styles and refer to the styles by number. As an example, the figure below shows how a dialog box supports multiple font styles. The Fonts property indicates the number of font styles, while the FontID property refers to a given style by number.
To determine whether a component supports multiple styles, look in the block's property dialog box for a pair of properties whose names are
If the dialog box has no such properties for the component, then you cannot create multiple styles for that component. For example, in the Background panel of a block's dialog box, you can define the color of an outline, but you cannot create multiple concentric outlines of different colors.
Creating Styles
After locating the style-identifying pair of properties for the component you are interested in, follow these steps to create an additional style:
To view attributes of an existing style, set the ID property to the integer associated with that style. Then, properties on the dialog box panel other than the style-identifying pair reflect attributes of that style. For example, the figure below shows how the Sample portion of the Fonts panel of a dialog box displays either a large bold font or a font of medium size and weight, depending on whether the FontID value is set to 0 or 1.
Applying Styles
In some cases, creating a style implicitly causes the block to apply it. For example, creating an additional style for tick marks automatically creates an additional set of tick marks on the block. In other cases, creating a style does not implicitly cause the block to apply it. For example, even after you create an additional font style, you will not see its effect on the block until you indicate which text should use that style. This section describes how to apply styles that the block does not apply immediately after you create them.
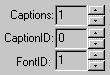
To determine where you can apply a style you have created, look for the corresponding ID property on a panel of the dialog box other than the panel where you defined the style. For example, the figure below shows part of a Captions panel containing the FontID property. The fact that the FontID property is not preceded by a Fonts property indicates that this is a panel that allows you to apply font styles but not define them.
Once you have located a part of the dialog box where you can apply a style you previously created, set the ID property to match the ID property of that style. For example, the figure above shows that the block has exactly one caption, and that the caption's font style is the one whose ID is 1. If you change the FontID value in the Captions panel to a different number, then you will probably notice a change in some text on the block.
| | Modifying ActiveX Control Properties | Understanding ID Properties | |