

| Virtual Reality Toolbox | |
Virtual Reality Toolbox Viewer
The Virtual Reality Toolbox contains a viewer as the default method for viewing virtual worlds. You can use this viewer on any supported operating system. For a list of supported operating systems, see System Requirements. The following topic provides an overview of the features and controls of the viewer.
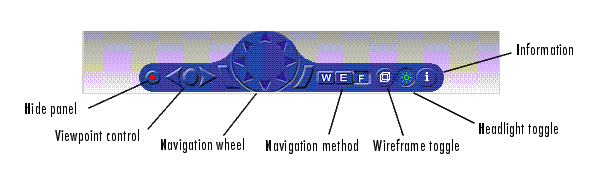
Viewpoint Control
There are three buttons on the control panel that affect the viewpoint of the scene. The center circular button resets the camera to the current viewpoint. This button is useful when you have been moving about the scene and need to reorient yourself. The keyboard equivalents of this button are Home and R. The Esc key resets the camera to the default viewpoint.
You can use the right and left arrows associated with viewpoint control to browse through predefined viewpoints. These buttons are inactive if other viewpoints are not specified by the author. You can also use the Page Up and Page Down keys to navigate through these viewpoints.
Control Menu
Access the control menu by right-clicking in the viewer window. You can use the control menu to specify a predefined viewpoint or change the appearance of the control panel. You can also control the navigation method, speed, and rendering of the virtual world. For more information about navigation methods, see Navigation. For more information about rendering, see Rendering.
Changing the Navigation Speed
| Note Your navigation speed controls the distance you move with each keystroke. It does not affect rendering speed. |
Consider setting a higher speed for large scenes and a slower speed for more controlled navigation in smaller scenes.
Rendering
You can change the rendering of the scene through the control panel or the control menu. The vrpend demo is used to demonstrate the viewer's functionality.
You can turn the antialiasing of the scene on or off. Antialiasing is a technique that attempts to smooth the appearance of jagged lines. These jagged lines are the result of a printer or monitor's not having enough resolution to represent a line smoothly. When Antialiasing is on, the jagged lines are surrounded by shades of gray or color. Therefore, the lines appear fuzzy rather than jagged.
You can turn the camera headlight and the lighting of the scene on or off. When Headlight is off, the camera does not emit light. Consequently, the scene can appear dark. For example, the following figure depicts the vrpend demo with Headlight(on).
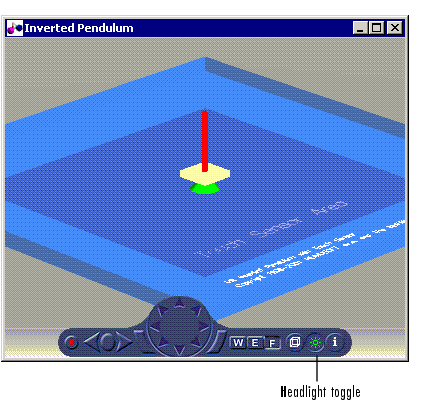
The scene looks darker when Headlight is set to off.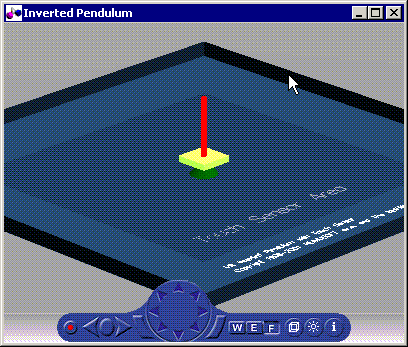
| Note It is helpful to define enough lighting within the virtual scene so that it is lit regardless of the Headlight setting. |
When Lighting is off, the virtual world appears as if lit in all directions. Shadows disappear and the scene loses some of its three-dimensional quality. The following is the vrpend demo with Lighting(off).

If Textures is off, objects do not have texture in the virtual scene.
If Transparency is off, transparent objects are rendered as solid objects.
Turning Wireframe on changes the scene's objects from solid to wireframe renderings.
Navigation
You can navigate around a virtual scene using the control panel, control menu, mouse, and keyboard. The vrbounce demo is used to demonstrate the viewer's functionality.
Control Panel -- The center navigation wheel and two curved buttons on either side move you about the scene. Experiment by moving backward and forward and side to side until you become comfortable with the controls.
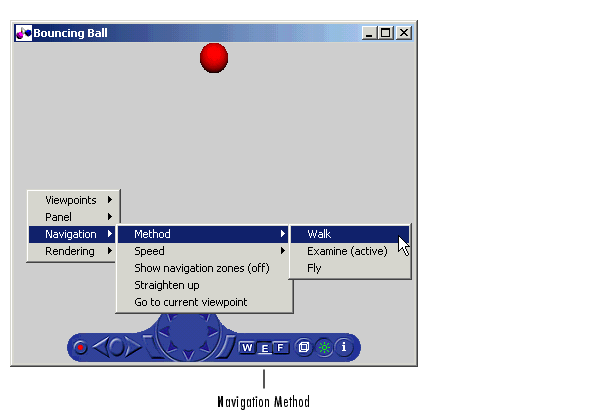
Control Menu -- Right-click in the viewer window to access the control menu. Point to Navigation and a new menu is displayed.
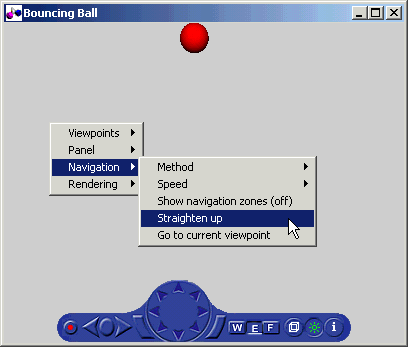
From this menu, you can reset the camera so that it is pointed straight ahead by choosing Straighten up. You can also return to the current viewpoint by choosing Go to current viewpoint. This option is useful if you are navigating about the scene and want to reorient yourself.
Mouse -- Navigation with the mouse depends on the navigation method you select and the navigation zone you are in when you first click and hold down the mouse button. You can set the navigation method using the W, E, or F buttons on the control panel or by right-clicking in the viewer. Point to Navigation. Next, point to Method and click Walk, Examine, or Fly.
To view the navigation zones for a scene, right-click in the viewer and point to Navigation. Then click Show navigation zones (off). The navigation zones are toggled on and appear in the virtual scene.
For example, using the vrbounce demo with Method set to Fly, there are three navigation zones.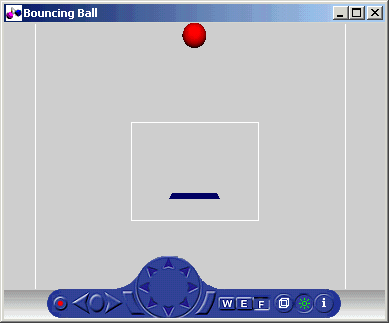
The following table summarizes the behavior associated with the movement modes and navigation zones when you use your mouse to navigate through a virtual world. Turn the navigation zones on and experiment by clicking and dragging your mouse in the different zones of a virtual world.
If your virtual world contains sensors, these sensors take precedence over mouse navigation at the sensor's location.
Example of How Sensors Affect Mouse Navigation
If the sensor covers the entire navigable area, mouse navigation is effectively disabled. In this case, use the control panel or the keyboard to move about the scene. For a three-button mouse or a mouse with a clickable wheel, you can always use the middle button or the wheel to move about the scene. The middle mouse button and wheel do not trigger sensors within the virtual world.
Keyboard -- It is also possible to use the keyboard to navigate through a virtual world. It can be faster and easier to issue a keyboard command, especially if you want to move the camera repeatedly in a single direction. The following table summarizes the keyboard commands and their associated navigation functions. Note that the letters presented do not need to be capitalized in order to perform their intended function.
| | Viewing a Virtual World | blaxxun Contact VRML Plug-in | |