| SimPowerSystems | |
System Startup and Steady State
Notice that the system is discretized, using sample time Ts (you should already have Ts = 50e-6 defined in your workspace).
The system is programmed to start and reach a steady state. Then a step is applied to the reference current to observe the dynamic response of the regulators.
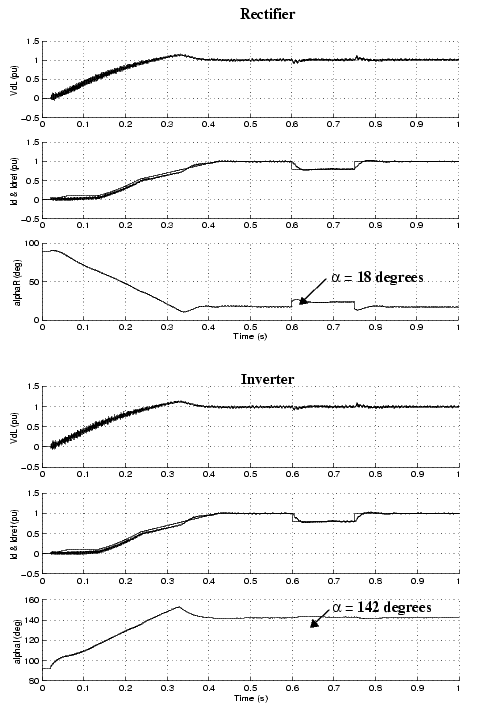
Start the simulation and observe the signals on the rectifier and inverter scopes. The waveforms are reproduced here:
Figure 2-31: Startup of the DC System and Step Applied on the Reference Current
The reference current follows a ramp from zero to 1 p.u. (2 kA) in 0.4 s. Observe that the DC current starts to build up at t = 20 ms, time at which the controller and the pulse generators are deblocked. The DC current and voltages start from zero and reach steady state in approximately 0.5 s. The rectifier controls the current and the inverter controls the voltage. Trace 1 of both rectifier and inverter scopes shows the DC line voltage (1 p.u. = 500 kV). Trace 2 shows the reference current and the measured Id current (1 p.u. = 2 kA). Once steady state is attained, the  firing angles are 18 degrees and 142 degrees respectively on the rectifier and inverter side.
Then at t = 0.6 s, a step is applied on the reference current to observe the dynamic response of the regulators.
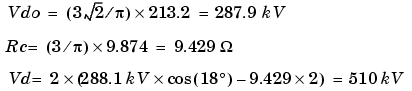
The main equations governing the steady-state operation of the DC system are given here so that you can compare the theoretical values to the simulation results.
The following expression relates the mean direct voltage Vd of a 12-pulse bridge to the direct current Id and firing angle :
where Vdo is the ideal no-load direct voltage for a six-pulse bridge:
Vc is the line-to-line rms commutating voltage that is dependent on the AC system voltage and the transformer ratio.
Rc is the equivalent commutating resistance
Xc is the commutating reactance or transformer reactance referred to the valve side.
The following rectifier parameters were used in the simulation.
The Vc voltage must take into account the effective value of the voltage on the 500 kV bus and the transformer ratio. If you look at the waveforms displayed on the V_I_Rect scope, you find 0.96 p.u.
If you open the rectifier transformer dialog box, you find a multiplication factor of 0.91 applied to the primary nominal voltage. The voltage applied to the inverter is therefore boosted by a factor of 1/0.91.
Vc = 0.96 * 200 kV/0.90 = 213.3 kV; Id = 2 kA =18º; Xc =0.24 p.u. based on 1200 MVA and 222.2 kV = 9.874 
This theoretical voltage corresponds well with the expected rectifier voltage calculated from the inverter voltage and the voltage drop in the DC line.
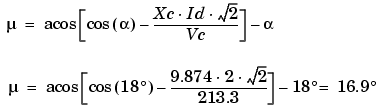
The µ commutation or overlap angle can also be calculated. Its theoretical value depends on , the DC current Id, and the commutation reactance Xc.
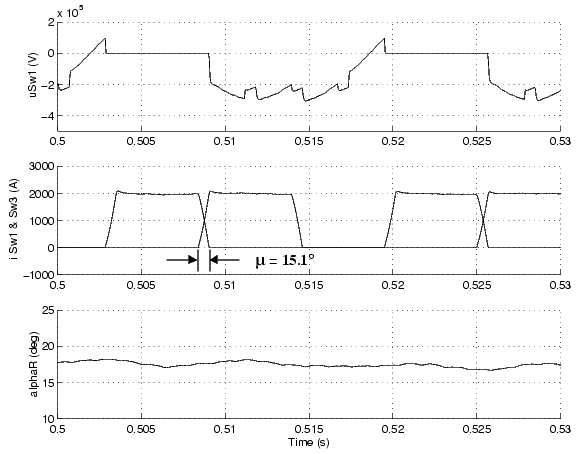
Now verify the commutation angle by plotting the currents in two valves, showing for example current extinction in valve 1 and current buildup in valve 3 of one six-pulse bridge of the rectifier.
Open the rectifier subsystem. Then open the upper bridge dialog box and select All voltages and currents for the Measurement parameter. Now copy the Multimeter block from the Measurements library into your case5 model. Double-click the Multimeter block. A window showing all the bridge voltages and currents appears. Select the following signals:
The number of signals (3) is displayed in the multimeter icon. Using a Demux block, send the three multimeter output signals to a two-trace scope (Trace 1: uSw1 Trace 2: iSw1 and iSw3). Restart the simulation. The waveforms illustrating two cycles are shown in the following figure. The measured commutation angle is 14 steps of 50 µs or 15.1º of a 60 Hz period. The resolution with a 50 µs time step is 1.1º, this angle compares reasonably well with the theoretical value.
Figure 2-32: Valve Voltage and Currents (Commutation from Valve 1 to Valve 3)
| | Description of the Control System | Response to a Step of Reference Current | |