| Model Browser User's Guide |
  |
Local Level: Toolbar
This toolbar appears when a local node is selected in the model tree.
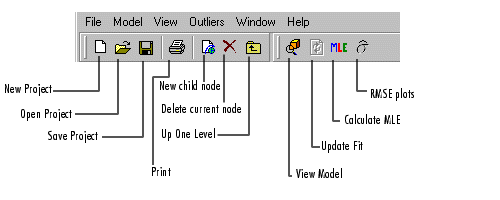
The seven left icons remain constant throughout the levels. They are for project and node management, and here the print icon is enabled as there are plots in this view. See Project Level: Toolbar for details on these buttons.
- View Model -- Opens a dialog displaying the terms in the current model.
- Update Fit -- This button is only enabled when data has been excluded from the plot using the Remove Outliers command (in the right-click context menu or the Outliers menu). At this point the local fit in the view is updated to fit only the remaining data, but this change also affects a point in all the global models. You can make this update to all the global models by using this toolbar button, or it happens automatically when another node is selected.
| Note
Update fit can affect several models. Removing an outlier from a best local model changes all the response features for that two-stage model. The global models all change; therefore the two-stage model must be recalculated. For this reason the local model node returns to the local (house) icon and the response node becomes blank again. If the two-stage model has a datum model defined, and other models within the test plan are using a datum link model, they are similarly affected.
|
- Calculate MLE -- Calculates the two-stage model using maximum likelihood estimation. This takes correlations between response features into account. See MLE for details.
- RMSE Plots -- Opens the RMSE Explorer dialog, where you can view plots of the standard errors of all the response features. There is one value of standard error per test for each response feature. You can also plot these standard errors against the global variables to examine the global distribution of error.
| | Local Level | | Local Level: Menus | |