| MATLAB Excel Builder | |
Creating The Visual Basic Form
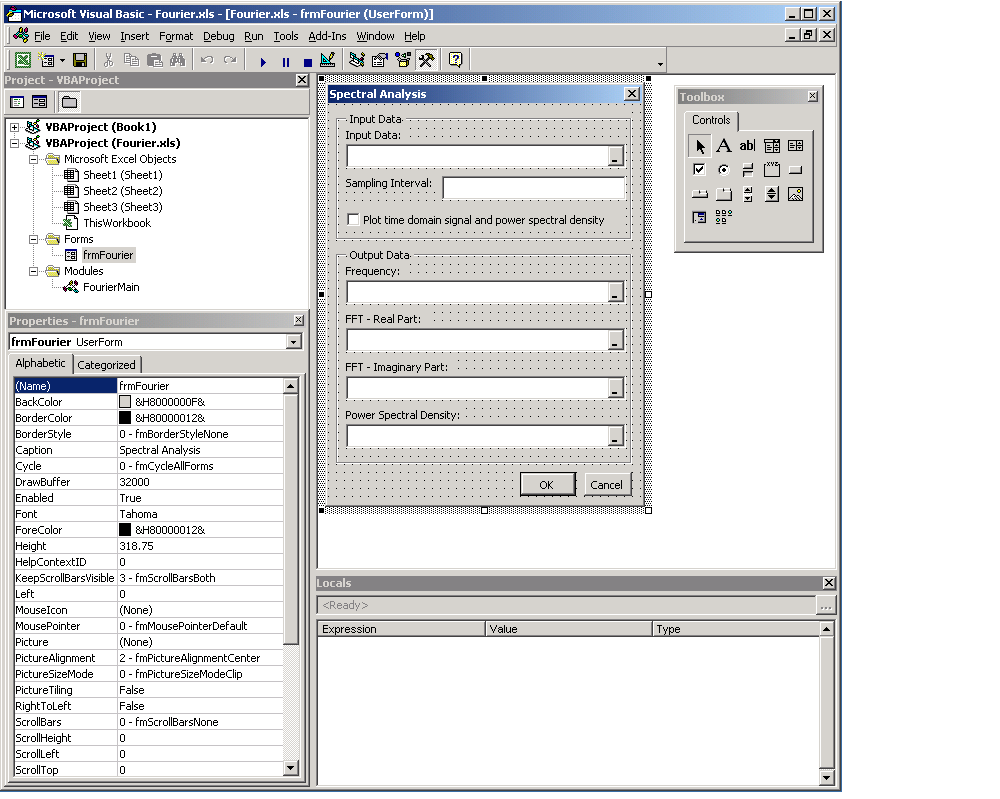
The next step in the integration process develops a user interface for your add-in using the Visual Basic Editor. Follow the steps outlined here to create a new user form and populate it with the necessary controls.
Forms in the VBA Project. In the form's property page, set the name property to frmFourier and the Caption property to Spectral Analysis.
Figure 4-18: Creating the Visual Basic Form
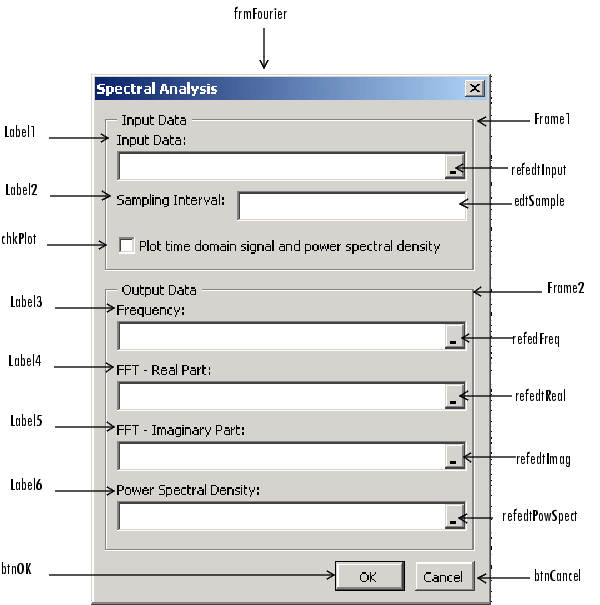
Figure 4-19, Layout of Controls on Main Form, shows the controls layout on the form.
Figure 4-19: Layout of Controls on Main Form
When the form and controls are complete, right-click on the form and select View Code from the pop-up menu. The following code listing shows the code to implement. Note that this code references the control and variable names listed above. If you have given different names for any of the controls or any global variable, change this code to reflect those differences.
'
'frmFourier Event handlers
'
Private Sub UserForm_Activate()
'UserForm Activate event handler. This function gets called before
'showing the form, and initializes all controls with values stored
'in global variables.
    On Error GoTo Handle_Error
    If theFourier Is Nothing Or theFFTData Is Nothing Then Exit Sub
    'Initialize controls with current state
    If Not InputData Is Nothing Then
        refedtInput.Text = InputData.Address
    End If
    edtSample.Text = Format(Interval)
    If Not Frequency Is Nothing Then
        refedtFreq.Text = Frequency.Address
    End If
    If Not IsEmpty (theFFTData.Real) Then
    If IsObject(theFFTData.Real) And TypeOf theFFTData.Real Is Range Then
            refedtReal.Text = theFFTData.Real.Address
        End If
    End If
    If Not IsEmpty (theFFTData.Imag) Then
    If IsObject(theFFTData.Imag) And TypeOf theFFTData.Imag Is Range Then
            refedtImag.Text = theFFTData.Imag.Address
        End If
    End If
    If Not PowerSpect Is Nothing Then
        refedtPowSpect.Text = PowerSpect.Address
    End If
    chkPlot.Value = bPlot
    Exit Sub
Handle_Error:
    MsgBox (Err.Description)
End Sub

Private Sub btnCancel_Click()
'Cancel button click event handler. Exits form without computing fft
'or updating variables.
    Unload Me
End Sub
Private Sub btnOK_Click()
'OK button click event handler. Updates state of all variables from controls
'and executes the computefft or plotfft method.
    Dim R As Range

    If theFourier Is Nothing Or theFFTData Is Nothing Then GoTo Exit_Form
    On Error Resume Next
    'Process inputs
    Set R = Range(refedtInput.Text)
    If Err <> 0 Then
        MsgBox ("Invalid range entered for Input Data")
        Exit Sub
    End If
    Set InputData = R
    Interval = CDbl(edtSample.Text)
    If Err <> 0 Or Interval <= 0 Then
        MsgBox ("Sampling interval must be greater than zero")
        Exit Sub
    End If
    'Process Outputs
    Set R = Range(refedtFreq.Text)
    If Err = 0 Then
        Set Frequency = R
    End If
    Set R = Range(refedtReal.Text)
    If Err = 0 Then
        theFFTData.Real = R
    End If
    Set R = Range(refedtImag.Text)
    If Err = 0 Then
        theFFTData.Imag = R
    End If
    Set R = Range(refedtPowSpect.Text)
    If Err = 0 Then
        Set PowerSpect = R
    End If
    bPlot = chkPlot.Value
    'Compute the fft and optionally plot power spectral density
    If bPlot Then
        Call theFourier.plotfft(3, theFFTData, Frequency, PowerSpect,_
     InputData, Interval)
    Else
        Call theFourier.computefft(3, theFFTData, Frequency, PowerSpect,_
     InputData, Interval)
    End If
    GoTo Exit_Form
Handle_Error:
    MsgBox (Err.Description)
Exit_Form:
    Unload Me
End Sub
| | Integrating the Component with Visual Basic for Applications | Adding The Spectral Analysis Menu Item to Excel | |