| xPC Target |
  |
Adding GPIB Driver Blocks
The GPIB driver blocks initialize and communicate directly with the GPIB controller. The GPIB controller then communicates with the GPIB devices on the instrument bus.
After you create a Simulink model, you can add GPIB driver blocks and define the initialization, send/receive, and termination message structures.
- In the MATLAB command window, type
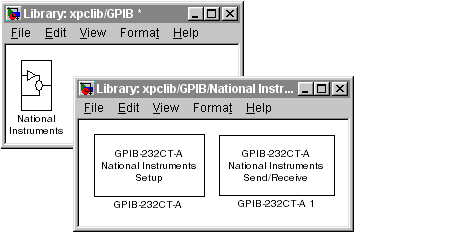
- The xPC Target driver block library opens.
- Double-click the GPIB group block.
- A manufacturers window opens. Currently xPC target only supports GPIB communication with a National Instruments controller.
- Double-click the National Instruments group block.
- A window with blocks for GPIB drivers opens.

- Alternatively, you could access the xPC Target block library from the Simulink Library Browser. In the Simulink window, and from the View menu, click Show Library Browser. In the left pane, double-click xPC Target, double-click GPIB, and then click National Instruments.
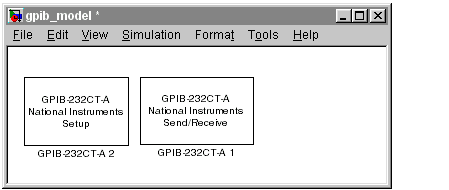
- Drag-and-drop a GPIB Setup block and a GPIB Send/Receive block to your Simulink model.
- Your model should look similar to the figure below. Notice, the input and output ports are not defined or visible on the blocks. The inputs and outputs are defined in a MATLAB message structure, and visible only after you load that structure into the MATLAB workspace and update your Simulink model.

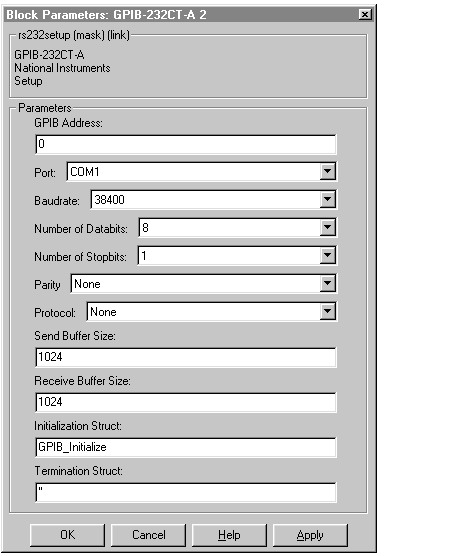
- Double-click the GPIB Setup block. Enter values that correspond to the DIP switch settings you set on the GPIB-232CT-A controller. In the Initialization Struct box, enter the name for the MATLAB structure this block uses to send initialization messages to the GPIB device.
- Note If you are not using an initialization or termination structure, enter two single quotes.
For example, if the target PC is connected to COM1, and you set the switches on the controller to 38400 baud, 8 databits, and 1 stopbit, your Block Parameter dialog box should look similar to the figure shown below.

For more information on entering the block parameters, see PC-DIO-24. For the procedure to create the initialization structure, see Creating GPIB Message Structures.
- Click OK. The Block Parameters dialog box closes.
- Double-click the GPIB Send/Receive block. The Block Parameters dialog opens.
- From the Port list, select either
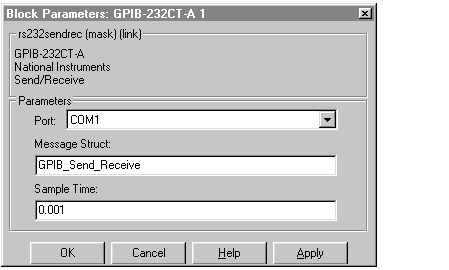
COM1 or COM2. This is the port on the target PC connected to the GPIB controller. In the Message Struct Name box, enter the name for the MATLAB structure this block uses to send and receive messages to the GPIB device. In the Sample Time box, enter the same sample time or multiple of the sample time you entered for the step size in the Simulation Parameters dialog box.
- Your Block Parameter dialog box should look similar to the figure shown below.

For more information on entering the block parameters, see PC-DIO-24.
- Click OK. The Block Parameters dialog box closes.
Your next task is to create the MATLAB message structures that the GPIB driver blocks use to sequence commands to the GPIB controller. See Creating GPIB Message Structures.
 | Using GPIB Drivers | | Creating GPIB Message Structures |  |


