| xPC Target |
  |
Entering the Real-Time Workshop Parameters
You enter the simulation and real-time run parameters in the Simulation Parameters dialog box. These parameters give information to Real-Time Workshop on how to build the target application from your Simulink model.
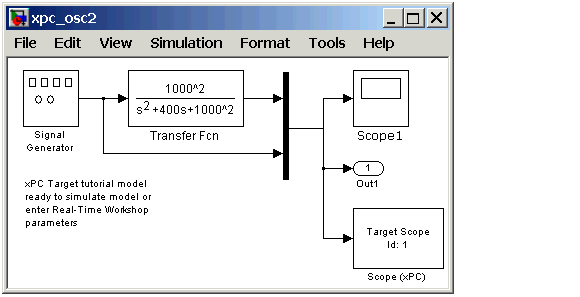
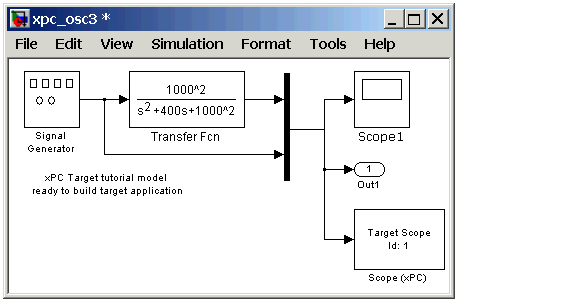
After you load a Simulink model and boot the target PC, you can enter the simulation parameters. This procedure uses the Simulink model xpc_osc2.mdl as an example and assumes you have already loaded that model. See Simulink Model.
- In the MATLAB Command Window, type
- MATLAB loads the oscillator model and displays the Simulink block diagram, as shown below.
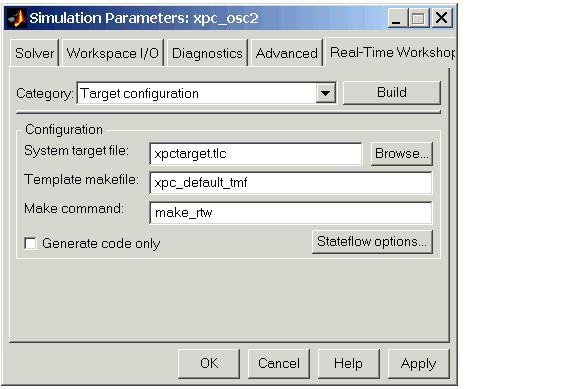
- In the Simulink window, and from the Simulation menu, click Parameters. In the Simulation Parameters dialog box, click the Real-Time Workshop tab.
- The Real-Time Workshop pane opens.
- Click the Browse button.
- The System Target File Browser opens.
- From the list, select
xpctarget.tlc xPC Target. Click OK.
- The system target file
xpctarget.tlc, the template makefile xpc_default_tmf, and the make command make_rtw are automatically entered into the page. The Real-Time Workshop pane should now look like the figure shown below.
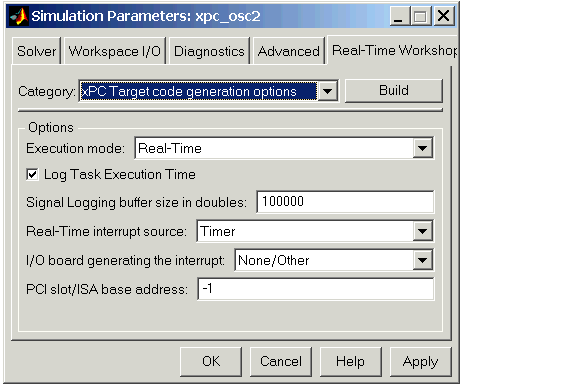
- From the Category list, select
xPC Target code generation options.
- The Real-Time Workshop pane opens to the options page.
- From the Mode list, select either
Real-Time or Freerun. The option Freerun is similar to a simulation, but with the generated code. It runs the target application as fast as it can. However, unlike a simulation, the Freerun mode of xPC Target does not support variable step solvers.
- Select the Log Task Execution Time check box to log task execution times to the target object property
tg.TETlog.
- The task execution time is the time in seconds to complete calculations for the model equations and post outputs during each sample interval.
- In the Signal Logging Buffer Size in Doubles box, enter the maximum number of sample points to save before wrapping. This buffer includes the time, states, outputs, and task execution time logs.
- From the Real-Time Interrupt Source list, select a source. The default value is
Timer.
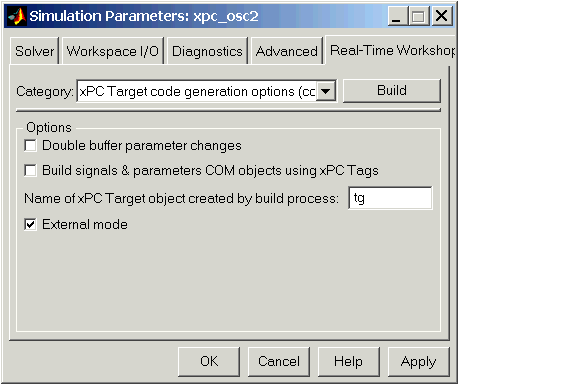
- From the Category list, select
xPC Target code generation options (cont.).
- The Real-Time Workshop pane opens to the options page.
- In the Name of xPC Target object box, enter the name of the target object created by the build process. The default target object name is
tg.
- Select the External mode check box. The build process adds code to the target application to communicate with your Simulink model for parameter tuning.
- The options pane should now look similar to the figure shown below.
- Click OK.
- From the File menu, click Save as. Enter a filename. For example, enter
xpc_osc3 and then click OK.
Your next task is to create (build) the target application. See Building and Downloading the Target Application.
| | Troubleshooting the Boot Process | | Building and Downloading the Target Application | |