| Real-Time Windows Target |
  |
I/O Board Dialog Box
Usually, the drivers with the Real-Time Windows Target provide the same flexibility of settings offered by the board manufacturer. You enter the I/O board settings in the I/O board dialog box. There are three types of settings:
- Software selectable -- Select check boxes in the I/O board dialog box. The driver writes the settings you selected to the board. Examples include A/D gain inputs, and selecting unipolar or bipolar D/A outputs.
- Jumper selectable and software readable -- Set jumpers or switches on the physical board. The driver reads the settings you selected.
- Jumper selectable, but not software readable -- Set jumpers or switches on the physical board, and then manually enter the same settings in the I/O board dialog box. These entries must match the hardware switches or jumpers you set on the board. This is necessary because some manufacturers do not provide a means for the I/O driver to read all of the board settings with software. Examples include base address, D/A gain, and differential or single-ended A/D inputs.
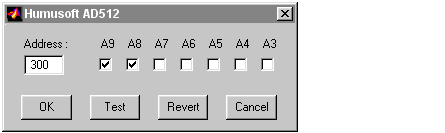
After you add an I/O driver block to your Simulink model, you can select and configure the I/O board installed in your computer. This procedure uses the AD512 I/O board from Humusoft as an example:
- Double-click an I/O driver block.
- The Block Parameters dialog box opens.
- Click the Install new board button. From the list, point to a manufacture, and then click a board name. For example, point to Humusoft, and then click AD512.

- The I/O board dialog box opens. The name of this dialog box depends on which I/O board you selected. The dialog box for the Humusoft AD512 board is shown below.
- Select one of the following:
- For an ISA bus board, enter a base address. This value must match the base address switches or jumpers set on the physical board. For example, to enter a base address of
0x300 in the address box, type
- For a PCI bus board, enter the PCI slot or select the Auto-detect check box.
- Click the Test button.
- The Real-Time Windows Target tries to connect to the selected board, and if successful, displays the following message.
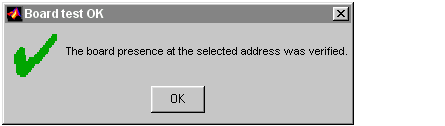
- On the message box, click OK, and then on the I/O board dialog box, click OK again.
- The I/O driver Block Parameters dialog box closes, and the parameter values are saved with your Simulink model.
The I/O board information is included with each I/O driver block. You only install and enter the board information once with the first I/O driver block you add to your model. When you add another I/O driver block, choose the I/O board from the list of installed boards. You do not need to enter any board information.
| | I/O Boards | | ISA Bus Board | |