
| Real-Time Workshop |   |
Building the Program
Once you have created the Simulink block diagram, added the device drivers, and configured the makefile template, you are ready to set the build options and initiate the build process.
Specifying the Real-Time Build Options
Set the real-time build options using the Solver and Real-Time Workshop pages of the Simulation Parameters dialog box. To access this dialog box, select Simulation Parameters from the Simulink Simulation menu.
In the Solver pane, for models with continuous blocks, set the Type to Fixed-step, the Step Size to the desired integration step size, and select the integration algorithm. For models that are purely discrete, set the integration algorithm to discrete.
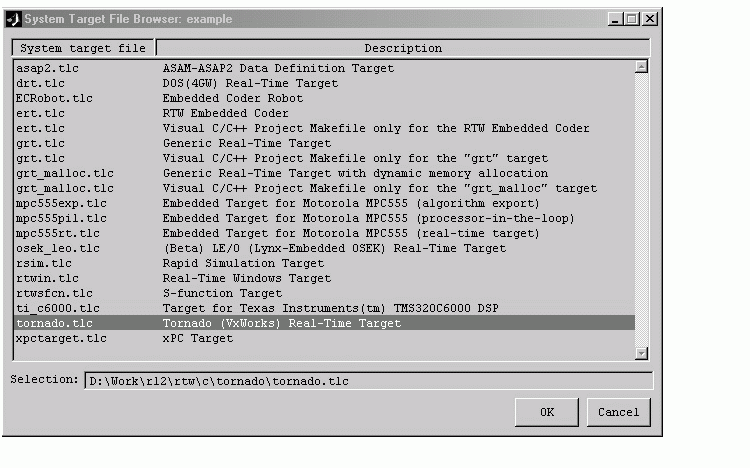
Next, use the System Target File Browser to select the correct Real-Time Workshop pane settings for Tornado. To access the browser, open the Real-Time Workshop pane of the Simulation Parameters dialog box and select Target configuration from the Category menu. Then click the Browse button. The System Target Browser opens.

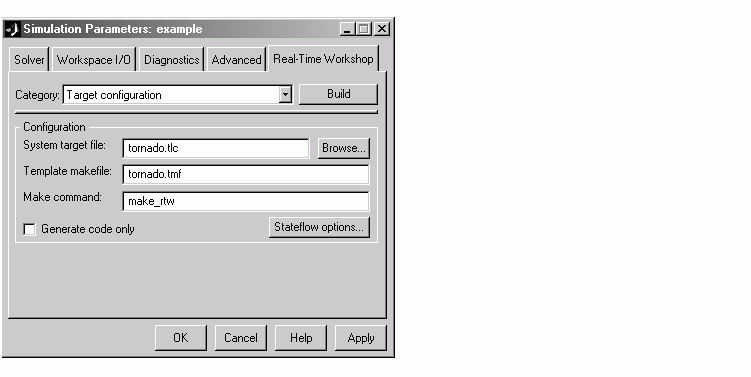
Select Tornado (VxWorks) Real-Time Target and click OK. This sets the Target configuration options correctly:

tornado.tlc
tornado.tmf template, which you must configure according to the instructions in Configuring the Template Makefile. (You can rename this file; simply change the dialog box accordingly.)
make_rtw
You can optionally inline parameters for the blocks in the C code, which can improve performance. Inlining parameters is allowed when using external mode.
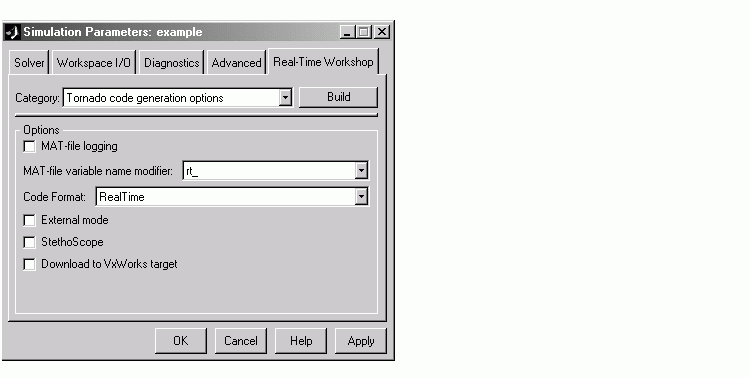
Code Generation Options. To specify code generation options specific to Tornado, open the Real-Time Workshop pane and select Tornado code generation options from the Category menu.

Real-Time Workshop provides flags that set the appropriate macros in the template makefile, causing any necessary additional steps to be performed during the build process.
The flags and switches are as follows:
model.mat at the end of program execution; this file will contain the variables that you specified in the Workspace I/O pane of the Simulation Parameters dialog box.
By default, the MAT-file is created in the root directory of the current default device in VxWorks. This is typically the host file system that VxWorks was booted from. Other remote file systems can be used as a destination for the MAT-file using rsh or ftp network devices or NFS. See the VxWorks Programmer's Guide for more information. If a device or filename other than the default is desired, add "-DSAVEFILE=filename" to the OPTS flag to the make command. For example,
-DVERBOSE to the OPTS flag in the make command. For example,
If you enable External mode, you cannot enable the StethoScope option.
RealTime or RealTimeMalloc code generation format.
rt_main, there are two command line arguments that control the block names used by StethoScope; you can use them when starting the program on VxWorks. See the section, Running the Program for more information on these arguments.
Additional options are available on the Real-Time Workshop pane. See Using the Real-Time Workshop Pane for information.
Initiating the Build
To build the program, click on the Build button in the Real-Time Workshop pane of the Simulation parameters dialog. The resulting object file is named with the .lo extension (which stands for loadable object). This file has been compiled for the target processor using the cross compiler specified in the makefile. If automatic downloading (Download to VxWorks target) is enabled in the Tornado code generation options, the target server is started and the object file is downloaded and started on the target. If StethoScope was checked on the Tornado code generation options, you can now start StethoScope on the host. The StethoScope object files, libxdr.so, libutilstssip.so, and libscope.so, will be loaded on the VxWorks target by the automatic download. See the StethoScope User's Manual for more information.
 | Configuring the Template Makefile | Downloading and Running the Executable Interactively |  |