
| Nonlinear Control Design Blockset |   |
Adjusting Constraints
To open the Nonlinear Control Design Blockset constraint window, double-click on the NCD block. As shown below, the title of the constraint figure includes the name of the Simulink system in which the NCD block resides (in this case the system ncdtut1). The constraint window contains a response versus time axis, a control panel, and default upper and lower constraint bounds. An Nonlinear Control Design Blockset menu bar appears either at the top of the constraint figure or at the top of your screen depending upon what type of computer system you have.
The constraint window appears in a default location and default size. You can move the constraint window to a more convenient location or make it larger or smaller. The thickness of the constraint bounds holds no significance to the optimization formulated; it merely provides visual cues defining where constraint bounds can be clicked-and-dragged.
The lower and upper constraint bounds define a channel between which the signal response should fall. The default constraints effectively define a rise time of five seconds and a settling time of 15 seconds. These bounds must change to reflect the performance requirements proposed in the beginning of this section. To adjust the rise time constraint, position the mouse over the vertical line separating the lower bound constraint that ends at five seconds and the lower bound constraint that begins at five seconds. Press and hold down the (left) mouse button. The arrow should turn to a left/right drag cursor as shown below.
In this mode, you can change the time boundary of two constraints while maintaining the angle of both constraints. While still holding the mouse down, drag the constraint boundary to the right. Release the mouse after positioning the boundary as close as possible to 10 seconds. You may find it helpful to enable axis gridding while placing constraints. The Grid check box under the Style menu toggles axes gridding. If you insist on precisely placing constraint bound segments, use the Constraint Editor dialog box, which appears when you double-click over a constraint bound segment. See the "Edit Menu" section of Reference for more information on the Constraint Editor dialog box.
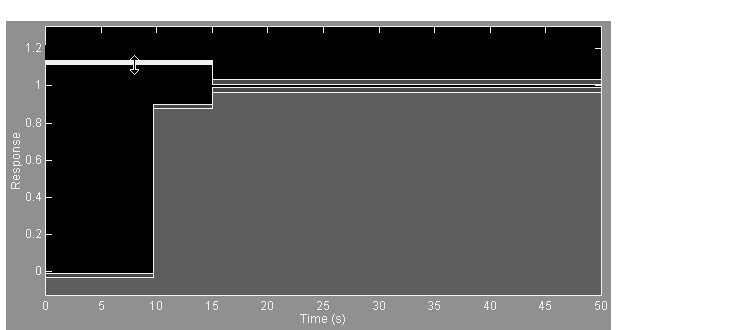
To adjust the overshoot constraint, press and hold the (left) mouse button somewhere in the middle of the upper bound constraint bound segment that extends from zero to fifteen seconds. Notice that the constraint bound segment changes color (meaning it is selected) and that the pointer becomes a up/down drag cursor. In this mode, you can drag a constraint vertically within the axes. While still holding the mouse button down, drag the constraint until its lower boundary is at a height of 1.1 as shown below.

Finally, the settling time constraints require adjustment. Position the mouse button just within the left edge of the upper bound constraint extending from 15 to 50 seconds. Press and hold down the (left) mouse button and notice that the constraint becomes selected and that pointer changes to a fleur. In this mode, you can stretch the end of the constraint at any angle. While still holding the mouse button down, drag the constraint so that the settling time constraint begins at 30 seconds. Consider enabling the snapping option if you have difficulty releasing the constraint so that it exactly ends up being horizontal. The Snap check box under the Style menu toggles constraint bound snapping. With snapping enabled any dragged constraint end snaps to an angle that is a multiple of 22.5 degrees. Adjust the lower bound constraint so that it too defines a 30 second settling time constraint. The constraint figure should now look the one shown below.
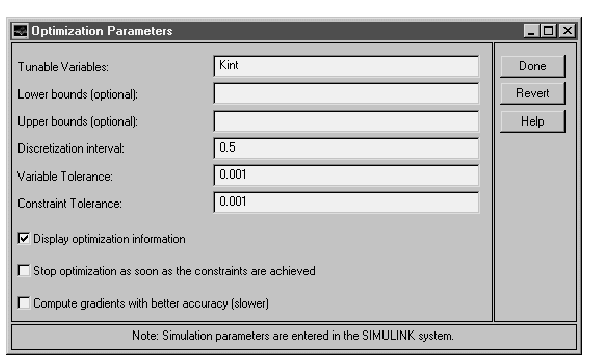
Before beginning the optimization, you must tell the Nonlinear Control Design Blockset which variables are tunable for optimization. Open the Optimization Parameters dialog box by selecting Parameters... from the Optimization menu. Simply type Kint into the Tunable Variables: editable text field as shown below.

If more than one tunable variable exists, type in the variable names separated by spaces. You might also want to change the discretization interval. This number relates to the number of constraints generated by the optimization; the larger the discretization interval, the fewer constraints generated but the less rigorous the optimization. Typical discretization intervals range between one and two percent of the total simulation time. For more technical information on how the discretization interval affects the optimization problem formulated by the Nonlinear Control Design Blockset, see the Appendix.
 | Nonlinear Control Design Blockset Startup | Running the Optimization |  |