| Model Browser User's Guide |
  |
Classical Design Browser
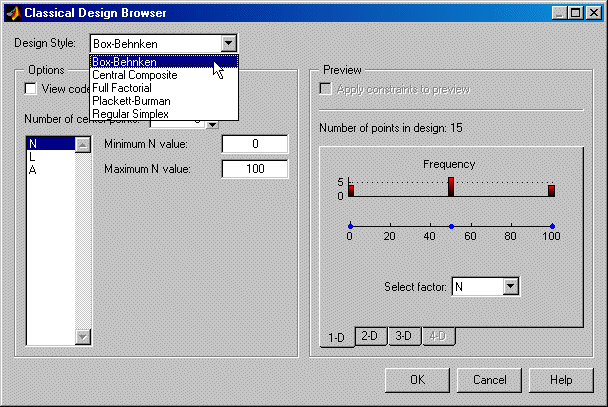
In the Design Style drop-down menu there are five classical design options:
- Generates a design that has a center point, a point at each of the design volume corners, and a point at the center of each of the design volume faces. You can choose a ratio value between the corner points and the face points for each factor and the number of center points to add. You can also specify a spherical design. Five levels are used for each factor.
- Similar to Central Composite designs, but only three levels per factor are required, and the design is always spherical in shape. All the design points (except the center point) lie on the same sphere, so there should be at least three to five runs at the center point. There are no face points. These designs are particularly suited to spherical regions, when prediction at the corners is not required.
- Generates an n-dimensional grid of points. You can choose the number of levels for each factor and the number of additional center points to add.
- These are "screening" designs. They are two-level designs that are designed to allow you to work out which factors are contributing any effect to the model while using the minimum number of runs. For example, for a 30-factor problem this can be done with 32 runs.
- These designs are generated by taking the vertices of a k-dimensional regular simplex (k = number of factors). For two factors a simplex is a triangle; for three it is a tetrahedron. Above that are hyperdimensional simplices. These are economical first-order designs that are a possible alternative to Plackett Burman or full factorials.
Set Up and View a Classical Design
- Choose a Box-Behnken design.
- Reduce the number of center points to 1.
- View your design in different projections using the tabs under the display.
- Click OK to return to the Design Editor.
- Use the PEV Viewer to see how well this design performs compared to the optimal design created previously; see the following illustration.
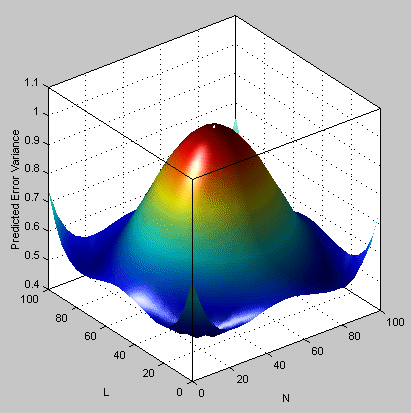
As you can see, this is not a realistic comparison, as this design has only 13 points (you can find this information in the bottom left of the main Design Editor display), whereas the previous optimal design had 100, but this is a good illustration of leverage. A single point in the center is very bad for the design, as illustrated in the PEV viewer surface plot. This point is crucial and needs far more certainty for there to be any confidence in the design, as every other point lies on the edge of the space. This is also the case for Central Composite designs if you choose the spherical option. These are good designs for cases where you are not able to collect data points in the corners of the operating space.
If you look at the PEV surface plot, you should see a spot of white at the center. This is where the predicted error variance reaches 1. For surfaces that go above 1, the contour at 1 shows as a white line, as a useful visual guide to areas where prediction error is large.
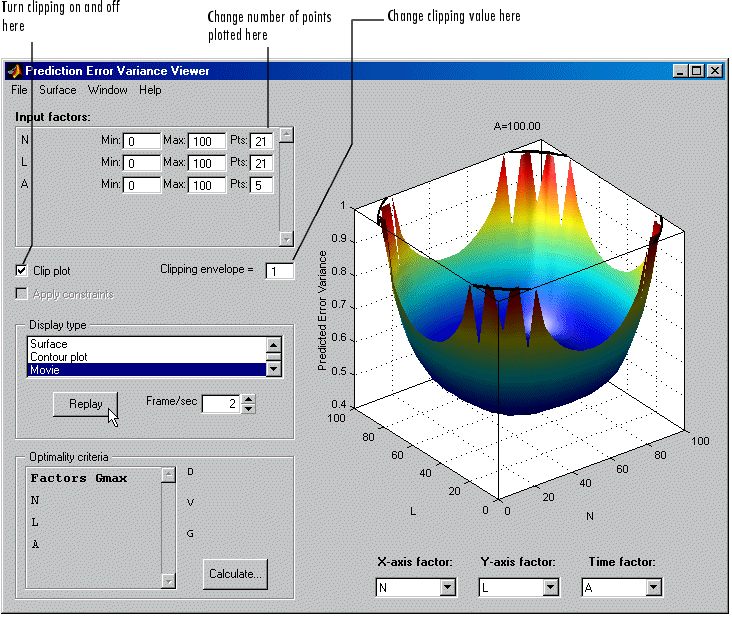
- Select Movie, and you see this white contour line as the surface moves through the plane of value 1.
- Select the Clip Plot check box. Areas that move above the value of 1 are removed. The edges of the clip are very jagged; you can make it smoother by increasing the numbers of points plotted for each factor. See the following example.
| | Classical Designs | | Design Evaluation Tool | |