| Real-Time Workshop Embedded Coder |
  |
Generating an ASAP2 File
You can generate an ASAP2 file from your model in one of the following ways:
- Use the Real-Time Windows Embedded Coder to generate an ASAP2 file as part of the code generation and build process.
- Use the ASAM-ASAP2 Data Definition Target to generate only an ASAP2 file, without building an executable.
- Add ASAP2 support to your own target (see Targets Supporting ASAP2).
This section discusses how to generate an ASAP2 file via the targets that have built-in ASAP2 support.
Generating ASAP2 Files via the Real-Time Windows Embedded Coder
The procedure for generating a mode's data definition in ASAP2 format via the Real-Time Windows Embedded Coder is as follows:
- Create the desired model. Use appropriate parameter names and signal labels to refer to
CHARACTERISTICS and MEASUREMENTS respectively.
- Define the relevant
ASAP2.Parameter and ASAP2.Signal objects in the MATLAB workspace.
- Configure the data objects to generate unstructured global storage declarations in the generated code by assigning one of the following storage classes to the
RTWInfo.StorageClass property:
ExportedGlobal
ImportedExtern
ImportedExternPointer
- Configure the other data object properties such as
LongID_ASAP2, PhysicalMin_ASAP2, etc.
- In the Advanced pane of the Simulation Parameters dialog box, select the Inline parameters option.
- Note that you should not configure the parameters associated with your data objects in the Model Parameter Configuration dialog box. If a parameter that resolves to a Simulink data object is configured using the Model Parameter Configuration dialog box, the dialog box configuration is ignored. You can, however, use the Model Parameter Configuration dialog to configure other parameters in your model.
- In the Real-Time Workshop pane, click Browse to open the System Target File Browser. In the browser, select the Real-Time Windows Embedded Coder Target.
- Select
ERT code generation options (2) from the Category menu of the Real-Time Workshop pane. Then select the Generate ASAP2 file option.
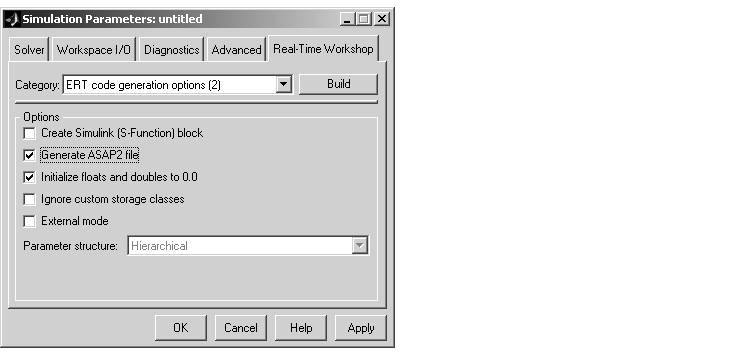
- Click Apply.
- Click Build (or Generate code).
- Real-Time Workshop writes the ASAP2 file to the build directory. The ASAP2 filename is controlled by the ASAP2 setup file. By default, the file is named
model.a2l.
Generating ASAP2 Files via the ASAM-ASAP2 Data Definition Target
The procedure for generating a model's data definition in ASAP2 format via the ASAM-ASAP2 Data Definition Target is as follows:
- Create the desired model. Use appropriate parameter names and signal labels to refer to
CHARACTERISTICS and MEASUREMENTS respectively.
- Define the relevant
ASAP2.Parameter and ASAP2.Signal objects in the MATLAB workspace.
- Configure the data objects to generate unstructured global storage declarations in the generated code by assigning one of the following storage classes to the
RTWInfo.StorageClass property:
ExportedGlobal
ImportedExtern
ImportedExternPointer
- Configure the other data object properties such as
LongID_ASAP2, PhysicalMin_ASAP2, etc.
- In the Advanced pane of the Simulation Parameters dialog box, select the Inline parameters option.
- Note that you should not configure the parameters associated with your data objects in the Model Parameter Configuration dialog box. If a parameter that resolves to a Simulink data object is configured using the Model Parameter Configuration dialog box, the dialog box configuration is ignored. You can, however, use the Model Parameter Configuration dialog to configure other parameters in your model.
- In the Real-Time Workshop pane, click Browse to open the System Target File Browser. In the browser, select the ASAM-ASAP2 Data Definition Target.
- Select
Target configuration from the Category menu of the Real-Time Workshop pane. Then select the Generate code only option.
- This picture shows the correct configuration.
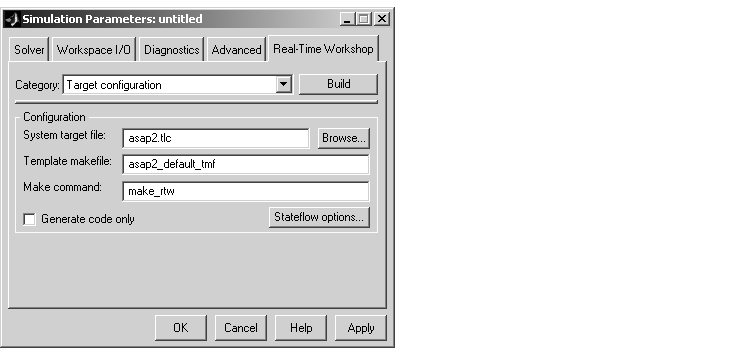
- Click Apply.
- Click Generate code.
- Real-Time Workshop writes the ASAP2 file to the build directory. The ASAP2 filename is controlled by the ASAP2 setup file. By default, the file is named
model.a2l.
| | Defining ASAP2 Information | | Customizing an ASAP2 File | |