| Dials & Gauges Blockset |
  |
Creating a New Set of Selections
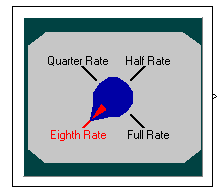
To vary the selections on the Frequency Selector block, it might be easier to remove the existing selections and create a new set. This section illustrates how to create a customized version of the Frequency Selector block that looks like this:

- Copy the Frequency Selector block from the library into a new model.
- From the model window, open the block's ActiveX Control Properties dialog box. All other steps in this procedure refer to this dialog box.
- Set up the block to configure selections and their captions automatically, by checking all the check boxes on the Auto panel and setting AutoOffsetStyle to
Vertical. The automatic configurations are a good starting point, from which you can make manual adjustments later.
- Define the dial's range of motion by setting AutoStartAngle to
225 and AutoStopAngle to 135. These numbers represent degrees, starting from the top of the block and moving clockwise.
- Remove all but one of the existing selections by setting the Selections property on the Selections panel to
1.
- Adjust the remaining selection by setting SelectionCaption to
Eighth Rate and setting Color to black.
- Add three additional selections by setting the Selections property to
4.
- Configure the additional selections one at a time. For each selection, first set SelectionID, and then change SelectionCaption according to the table below.
SelectionID
|
SelectionCaption
|
0
|
Eighth Rate
|
1
|
Quarter Rate
|
2
|
Half Rate
|
3
|
Full Rate
|
- Change the color of the currently chosen value to red by setting HighlightColor to red.
Manually Adjusting the Selections
It is generally easier to let the block determine the positions of selections and their captions. However, you can adjust the positions manually by using one or more of these techniques:
- To vary the horizontal justification of a selection caption, first clear the AutoAlign check box on the Auto panel. Then, on the Selections panel, set SelectionID to the ID of the selection you want to change and vary the SelectionAlign property.
- To vary the positions of the selection captions, first clear the AutoAlign and AutoOffset check boxes on the Auto panel, in that order. Then, on the Selections panel, set SelectionID to the ID of the selection you want to change and vary the SelectionOffsetX, SelectionOffsetY, and SelectionRadius properties.
- To vary the angles of a selection, first clear the AutoAngle check box on the Auto panel. Then, on the Selections panel, set SelectionID to the ID of the selection you want to change and vary the SelectionAngle property.
 | Customizing the Frequency Selector Block | | Changing Output Values |  |


